
Receipt Upload Portal
Table of Contents
- 1. Welcome
- 2. Logging In
- 3. Resetting Your Password (If You Forgot It)
- 4. Sending a Receipt
- 5. Reviewing and Submitting the Receipt
- 6. Sending Several Receipts at Once (Batch Mode)
- 7. Viewing Your Receipts
- 8. Viewing Receipt Details
- 9. Changing Your Password
- 10. Updating Your Name or Email
- 11. Logging Out
- 12. Using Dark Mode
- 13. Reviewing Check Runs (Signers & Trustees)
- 14. Bank Reconciliations (Signers & Trustees)
- 15. Payment Methods (Check and ACH)
- 16. Connecting QuickBooks Pastor Feature
- 17. Troubleshooting & Common Questions
- 18. Understanding Banners and Badges
1. Welcome
This portal lets you send pictures of your receipts and invoices to your parish. Your accountant reviews them and records them in the parish accounting system (QuickBooks).
Don't worry if you make a mistake — you can always go back and correct things before your accountant records the receipt.
What You Need
- An email address and password from your administrator
- A computer, tablet, or phone with internet access
- Your receipts (paper or digital)
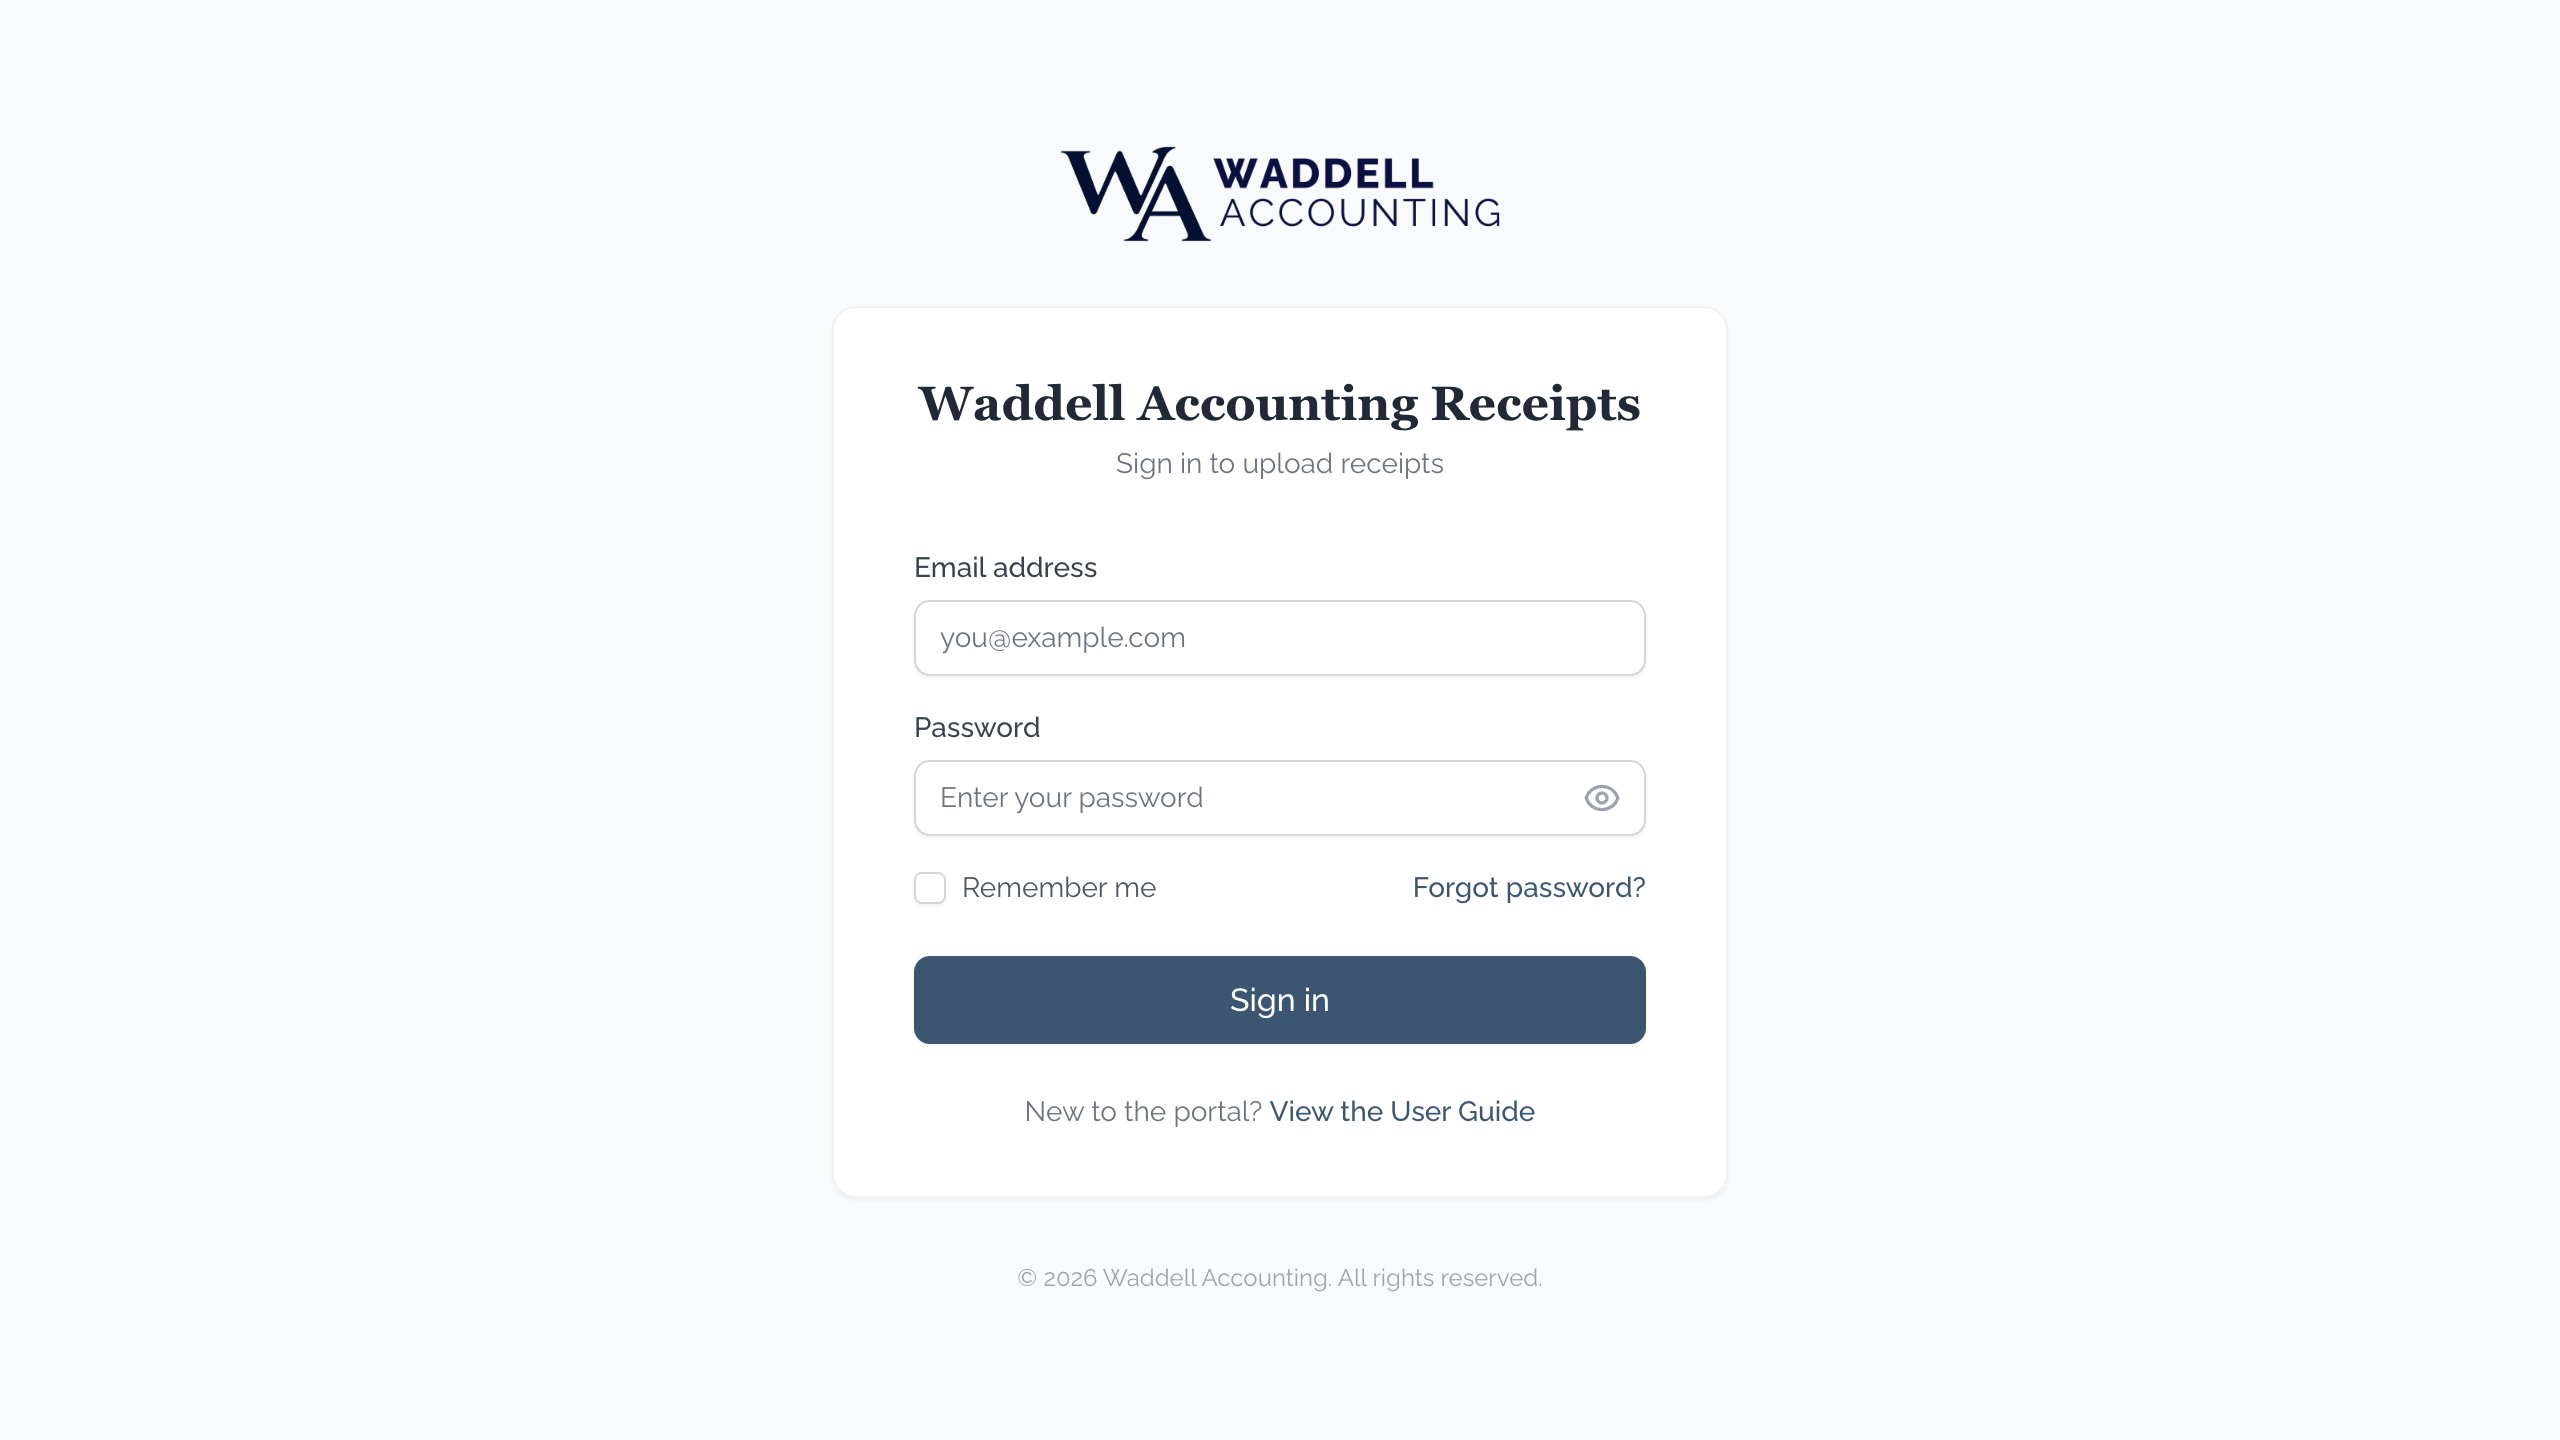
2. Logging In
On a Computer
- Open your internet browser (Chrome, Safari, Edge, or Firefox).
- Type the portal address into the long box at the top of your browser window. Your administrator will give you this address.
- Type your email address in the "Email" box.
- Type your password in the "Password" box.
- (Optional) Check "Remember me" if you are on your own personal computer.
- You may be asked to check a box to prove you are not a robot. Check the box and follow any instructions if prompted.
- Click the "Sign in" button.
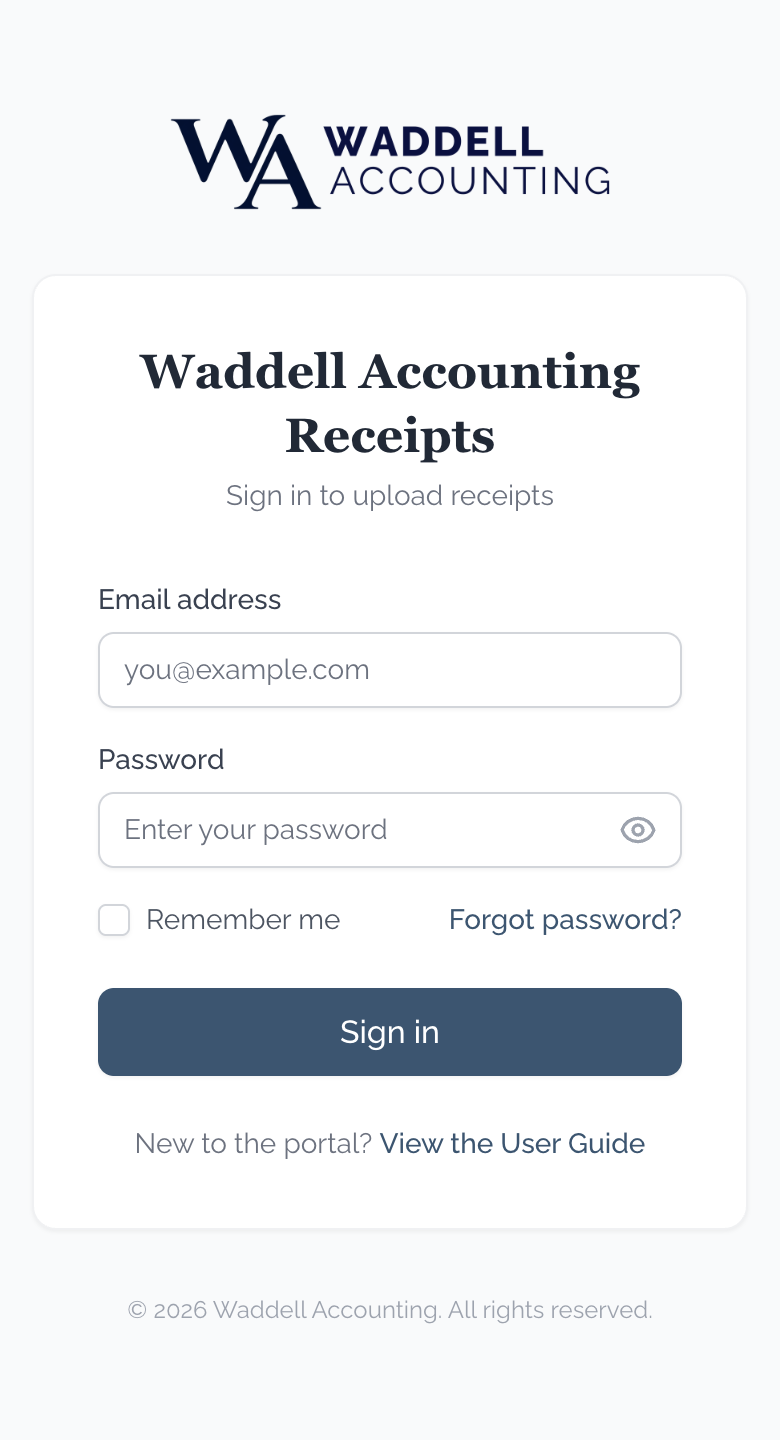
On a Phone or Tablet
- Open your browser (Safari on iPhone, Chrome on Android).
- Type the portal address into the long box at the top of your screen.
- Tap the "Email" box and type your email address.
- Tap the "Password" box and type your password.
- (Optional) Check "Remember me" if you are using your own personal device.
- You may be asked to check a box to prove you are not a robot. Check the box and follow any instructions if prompted.
- Tap the "Sign in" button.
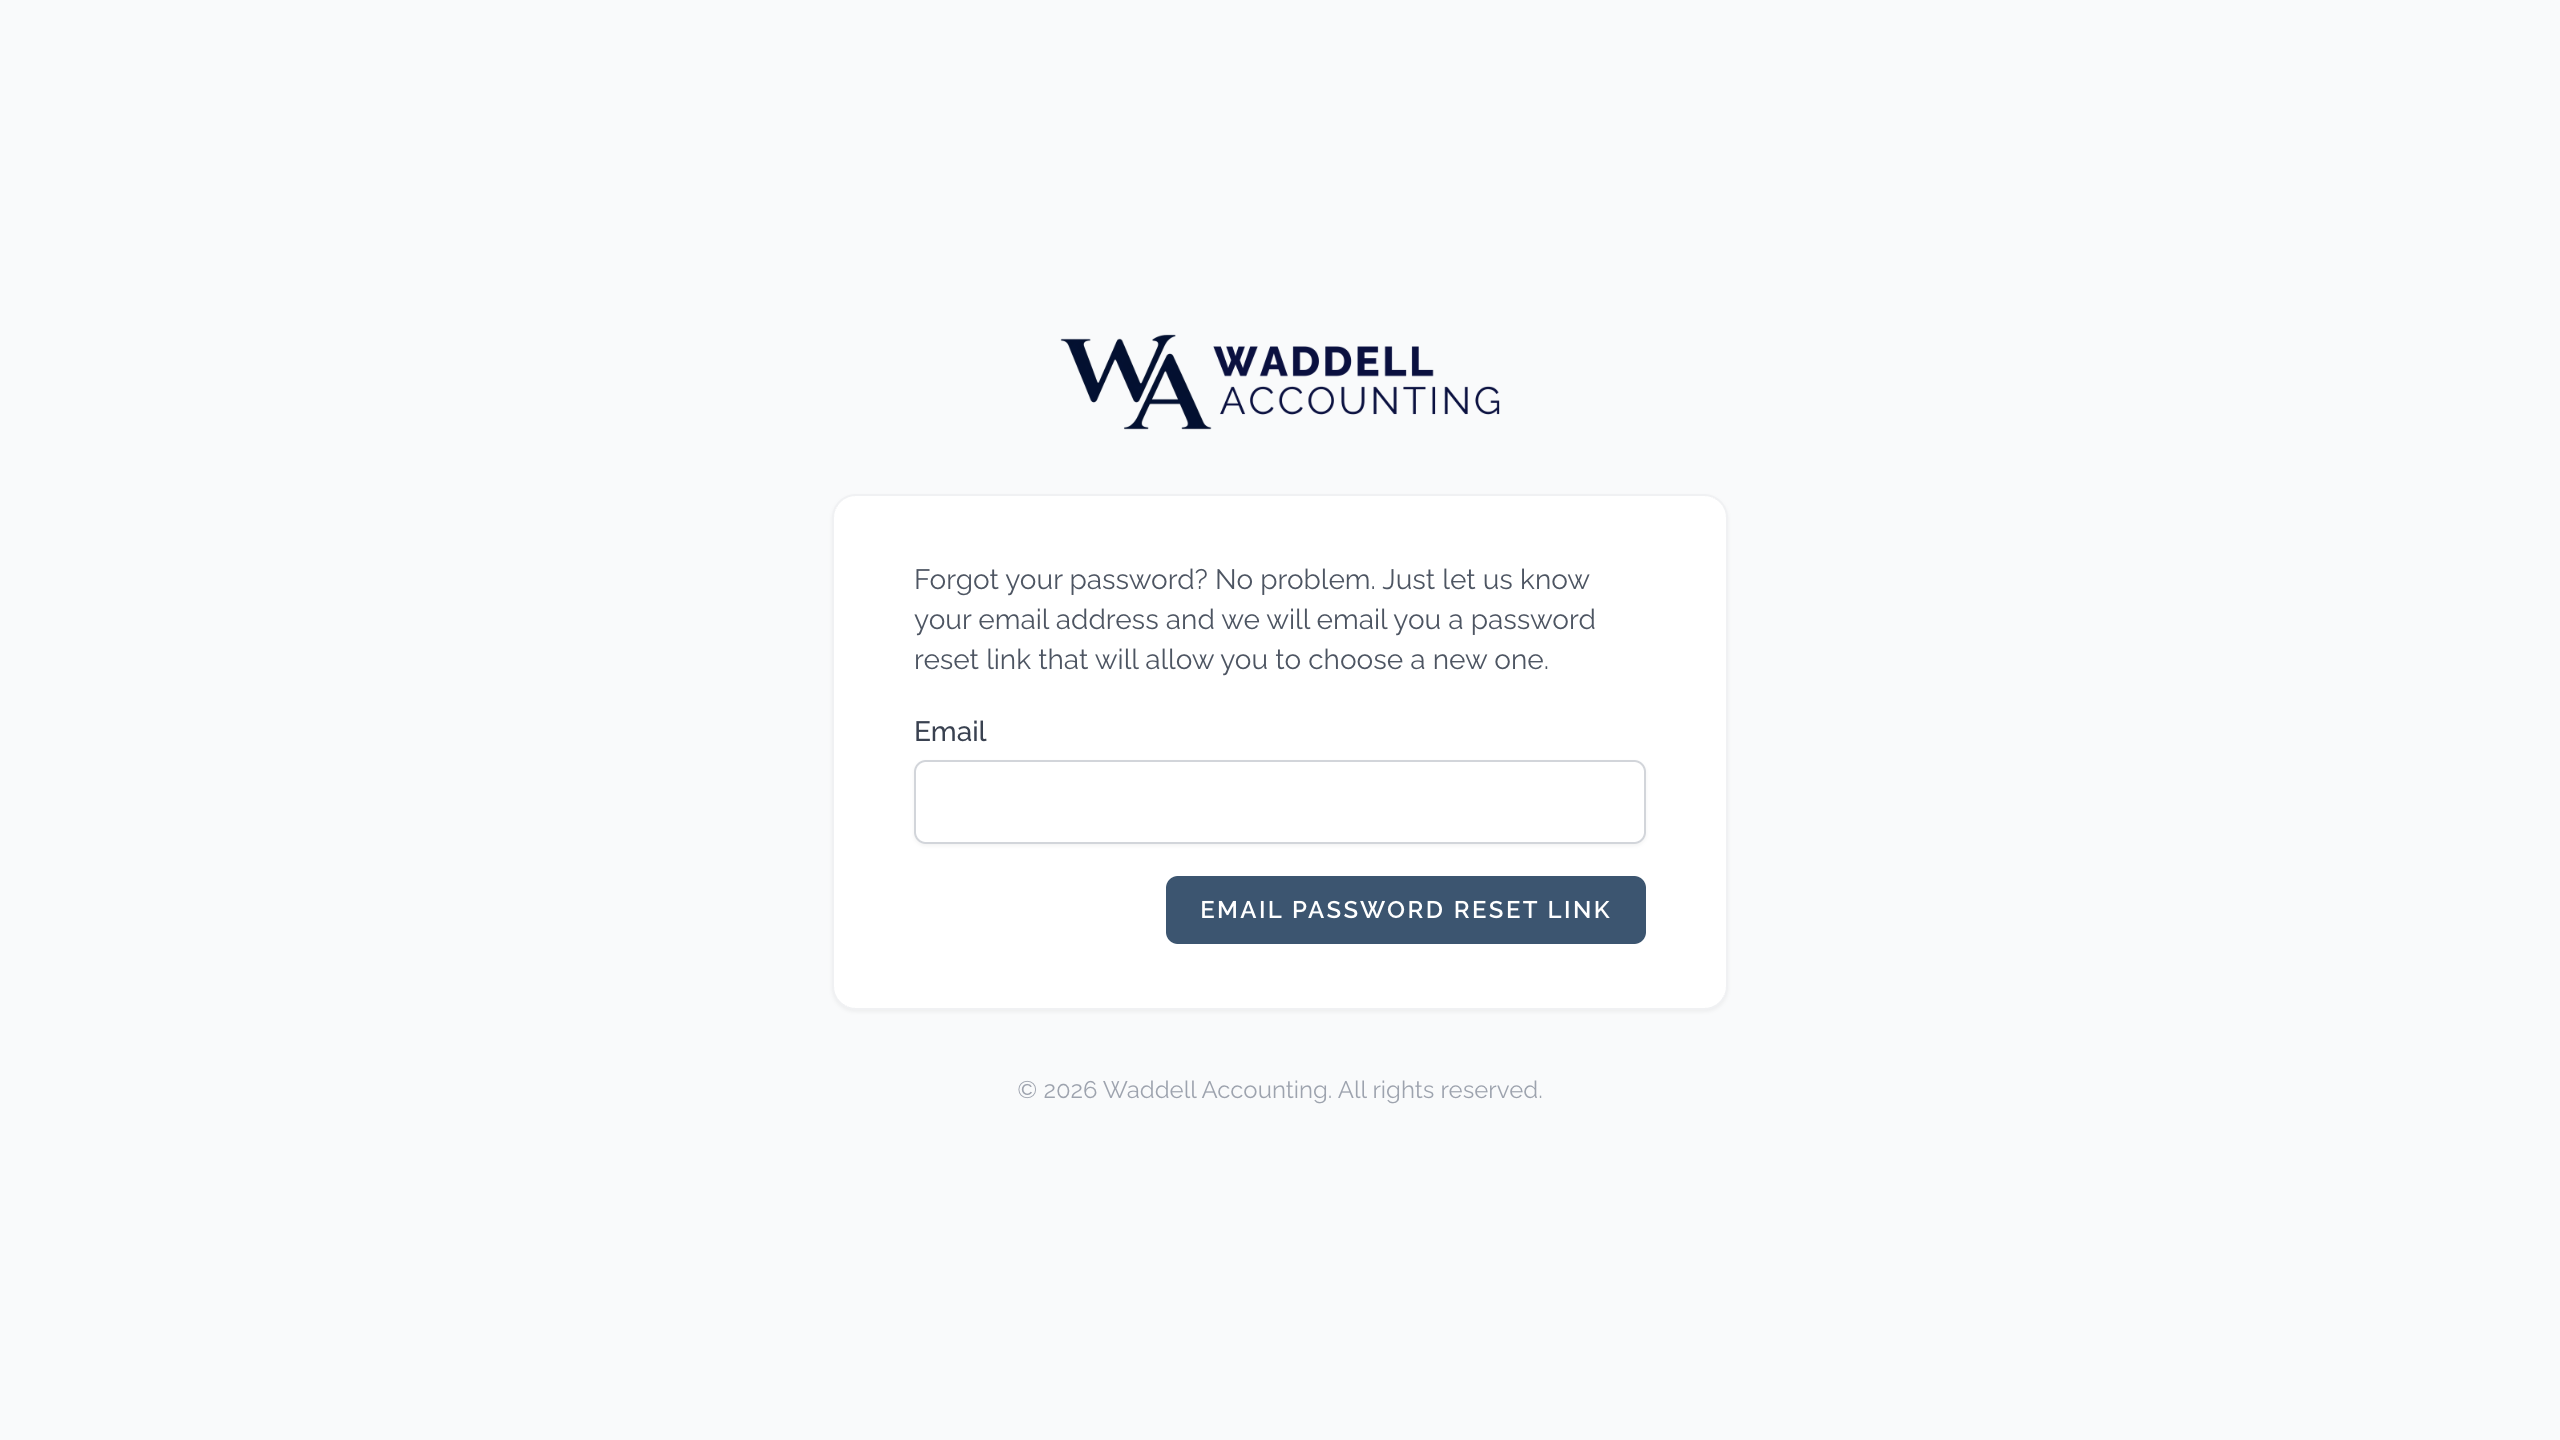
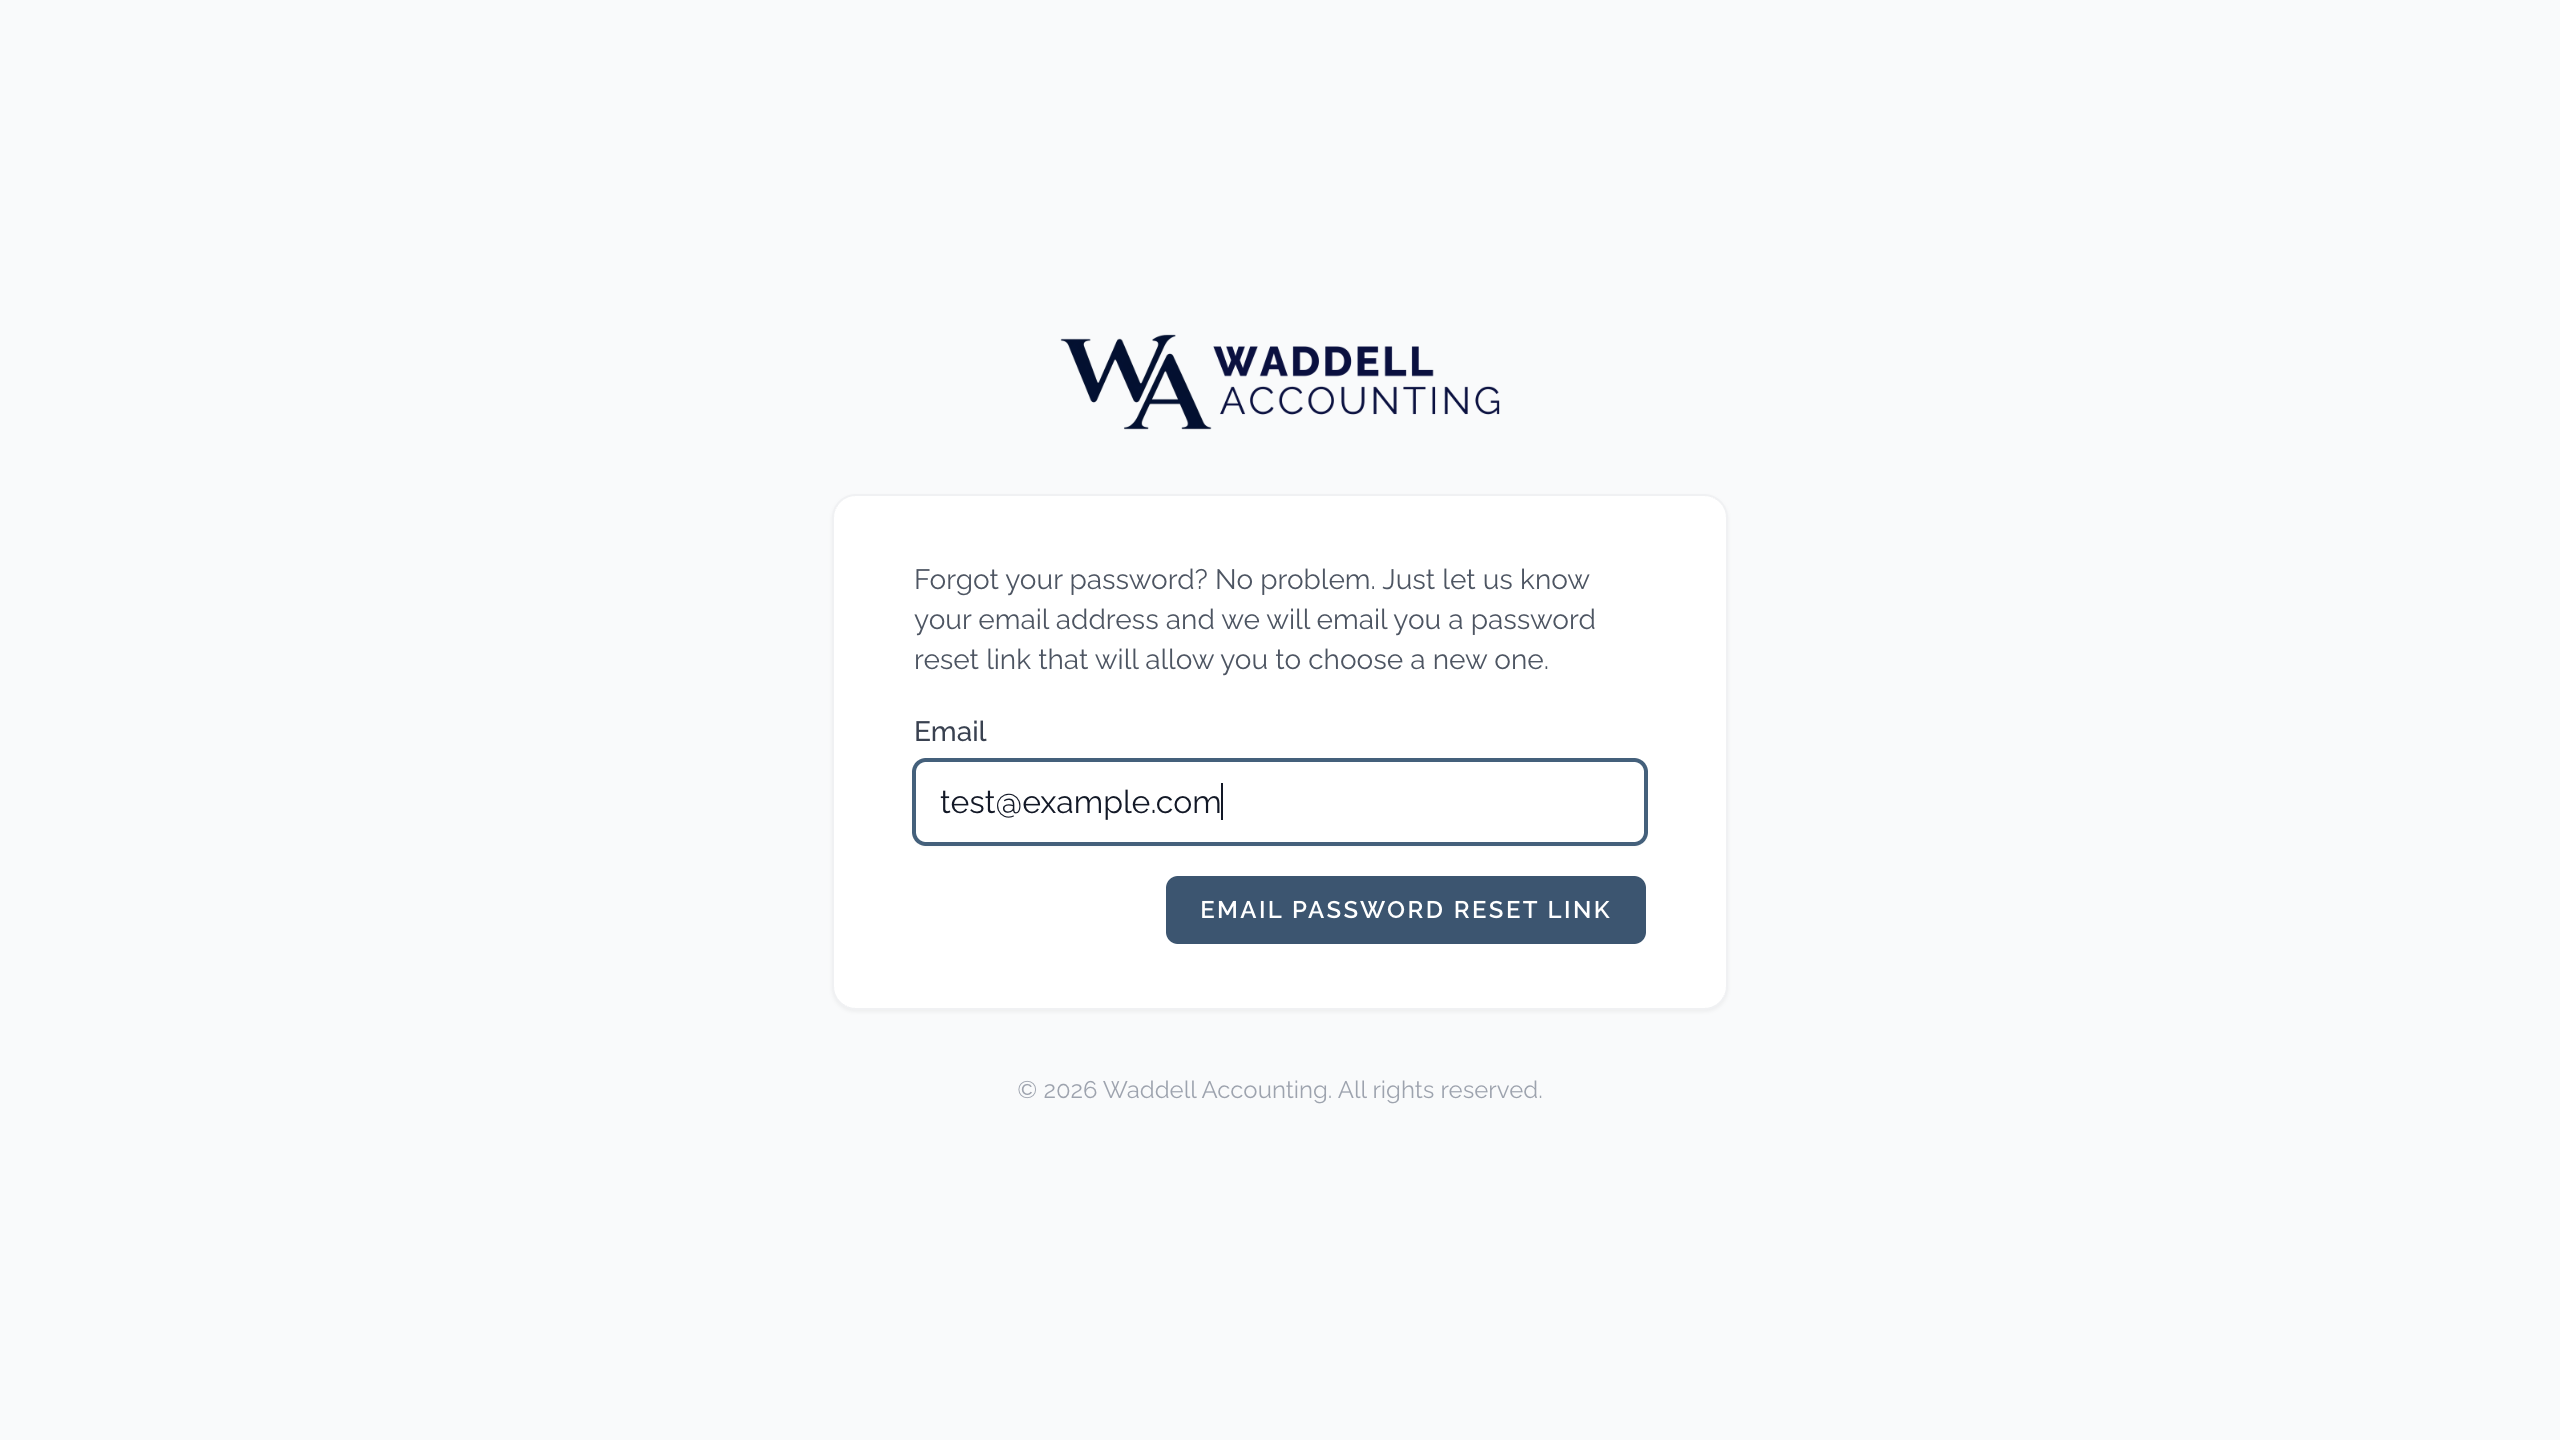
3. Resetting Your Password (If You Forgot It)
- On the login page, click or tap "Forgot password?"
- Type your email address.
- Click or tap "Email Password Reset Link."
- Check your email inbox. The email may take a minute to arrive.
- Open the email and click or tap the reset link inside it.
- Type your new password.
- Type the same new password again to confirm it.
- Click or tap "Reset Password."
- You will be taken back to the login page. Log in with your new password.
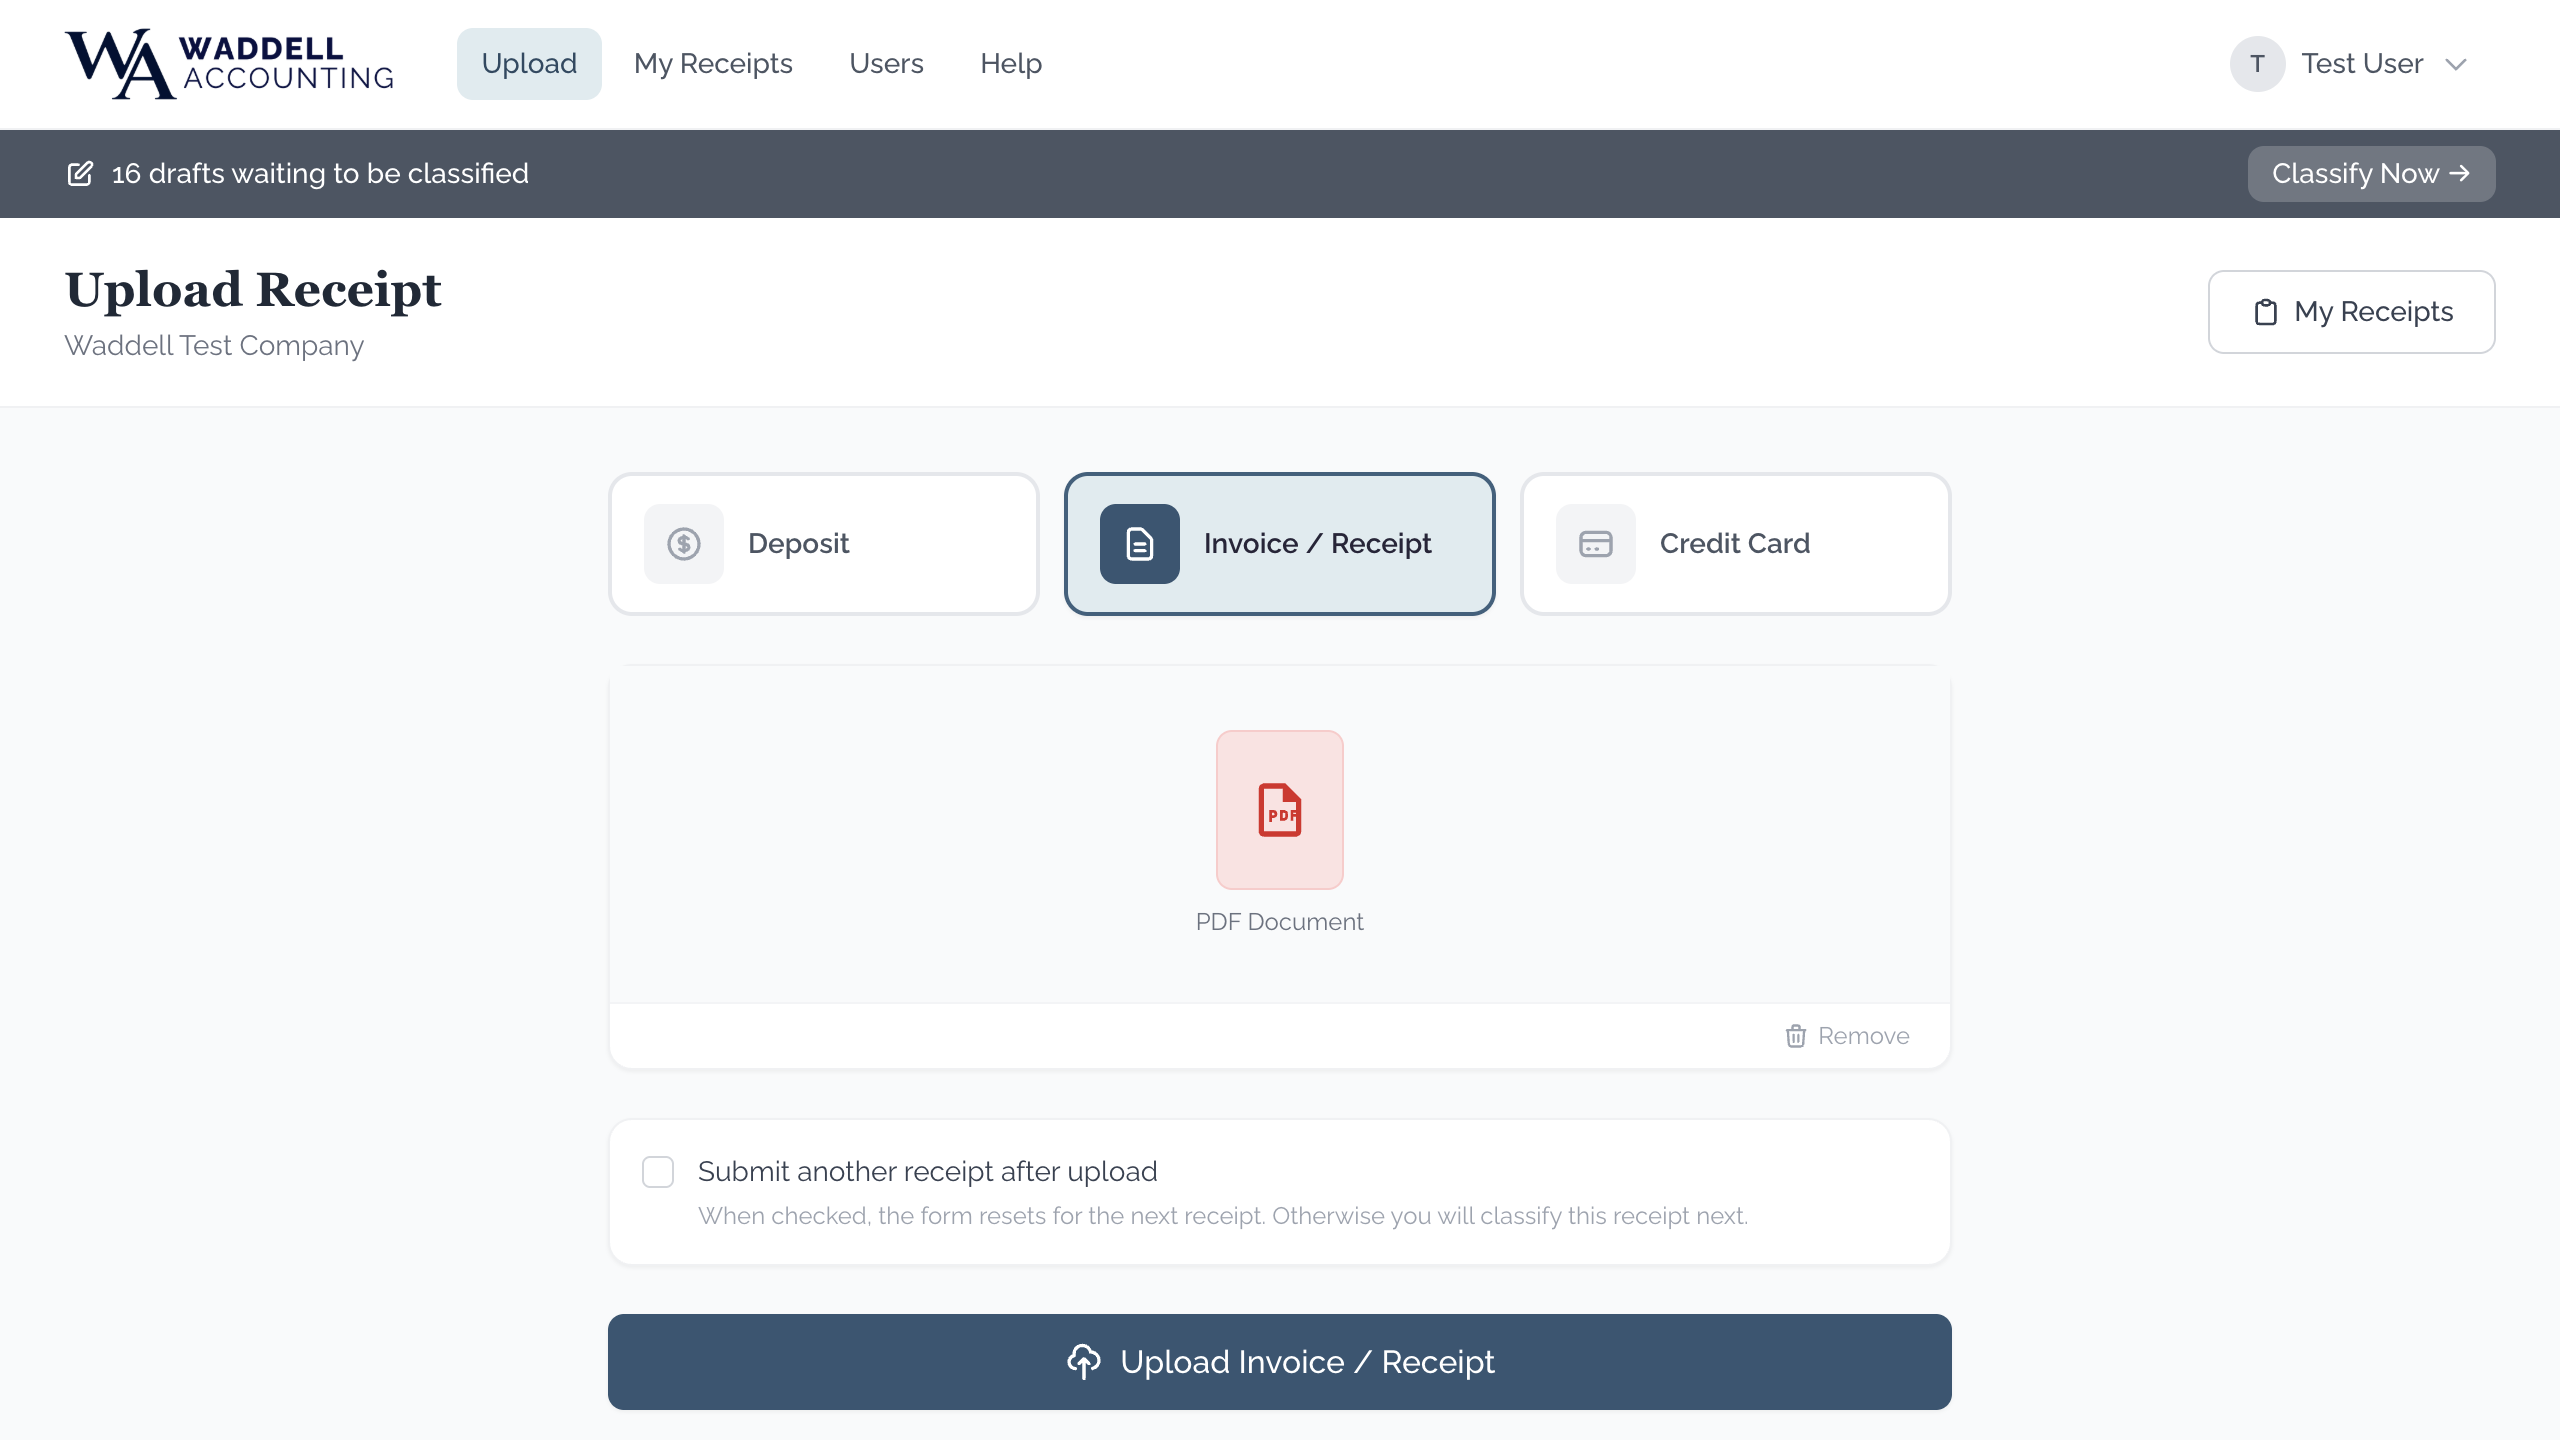
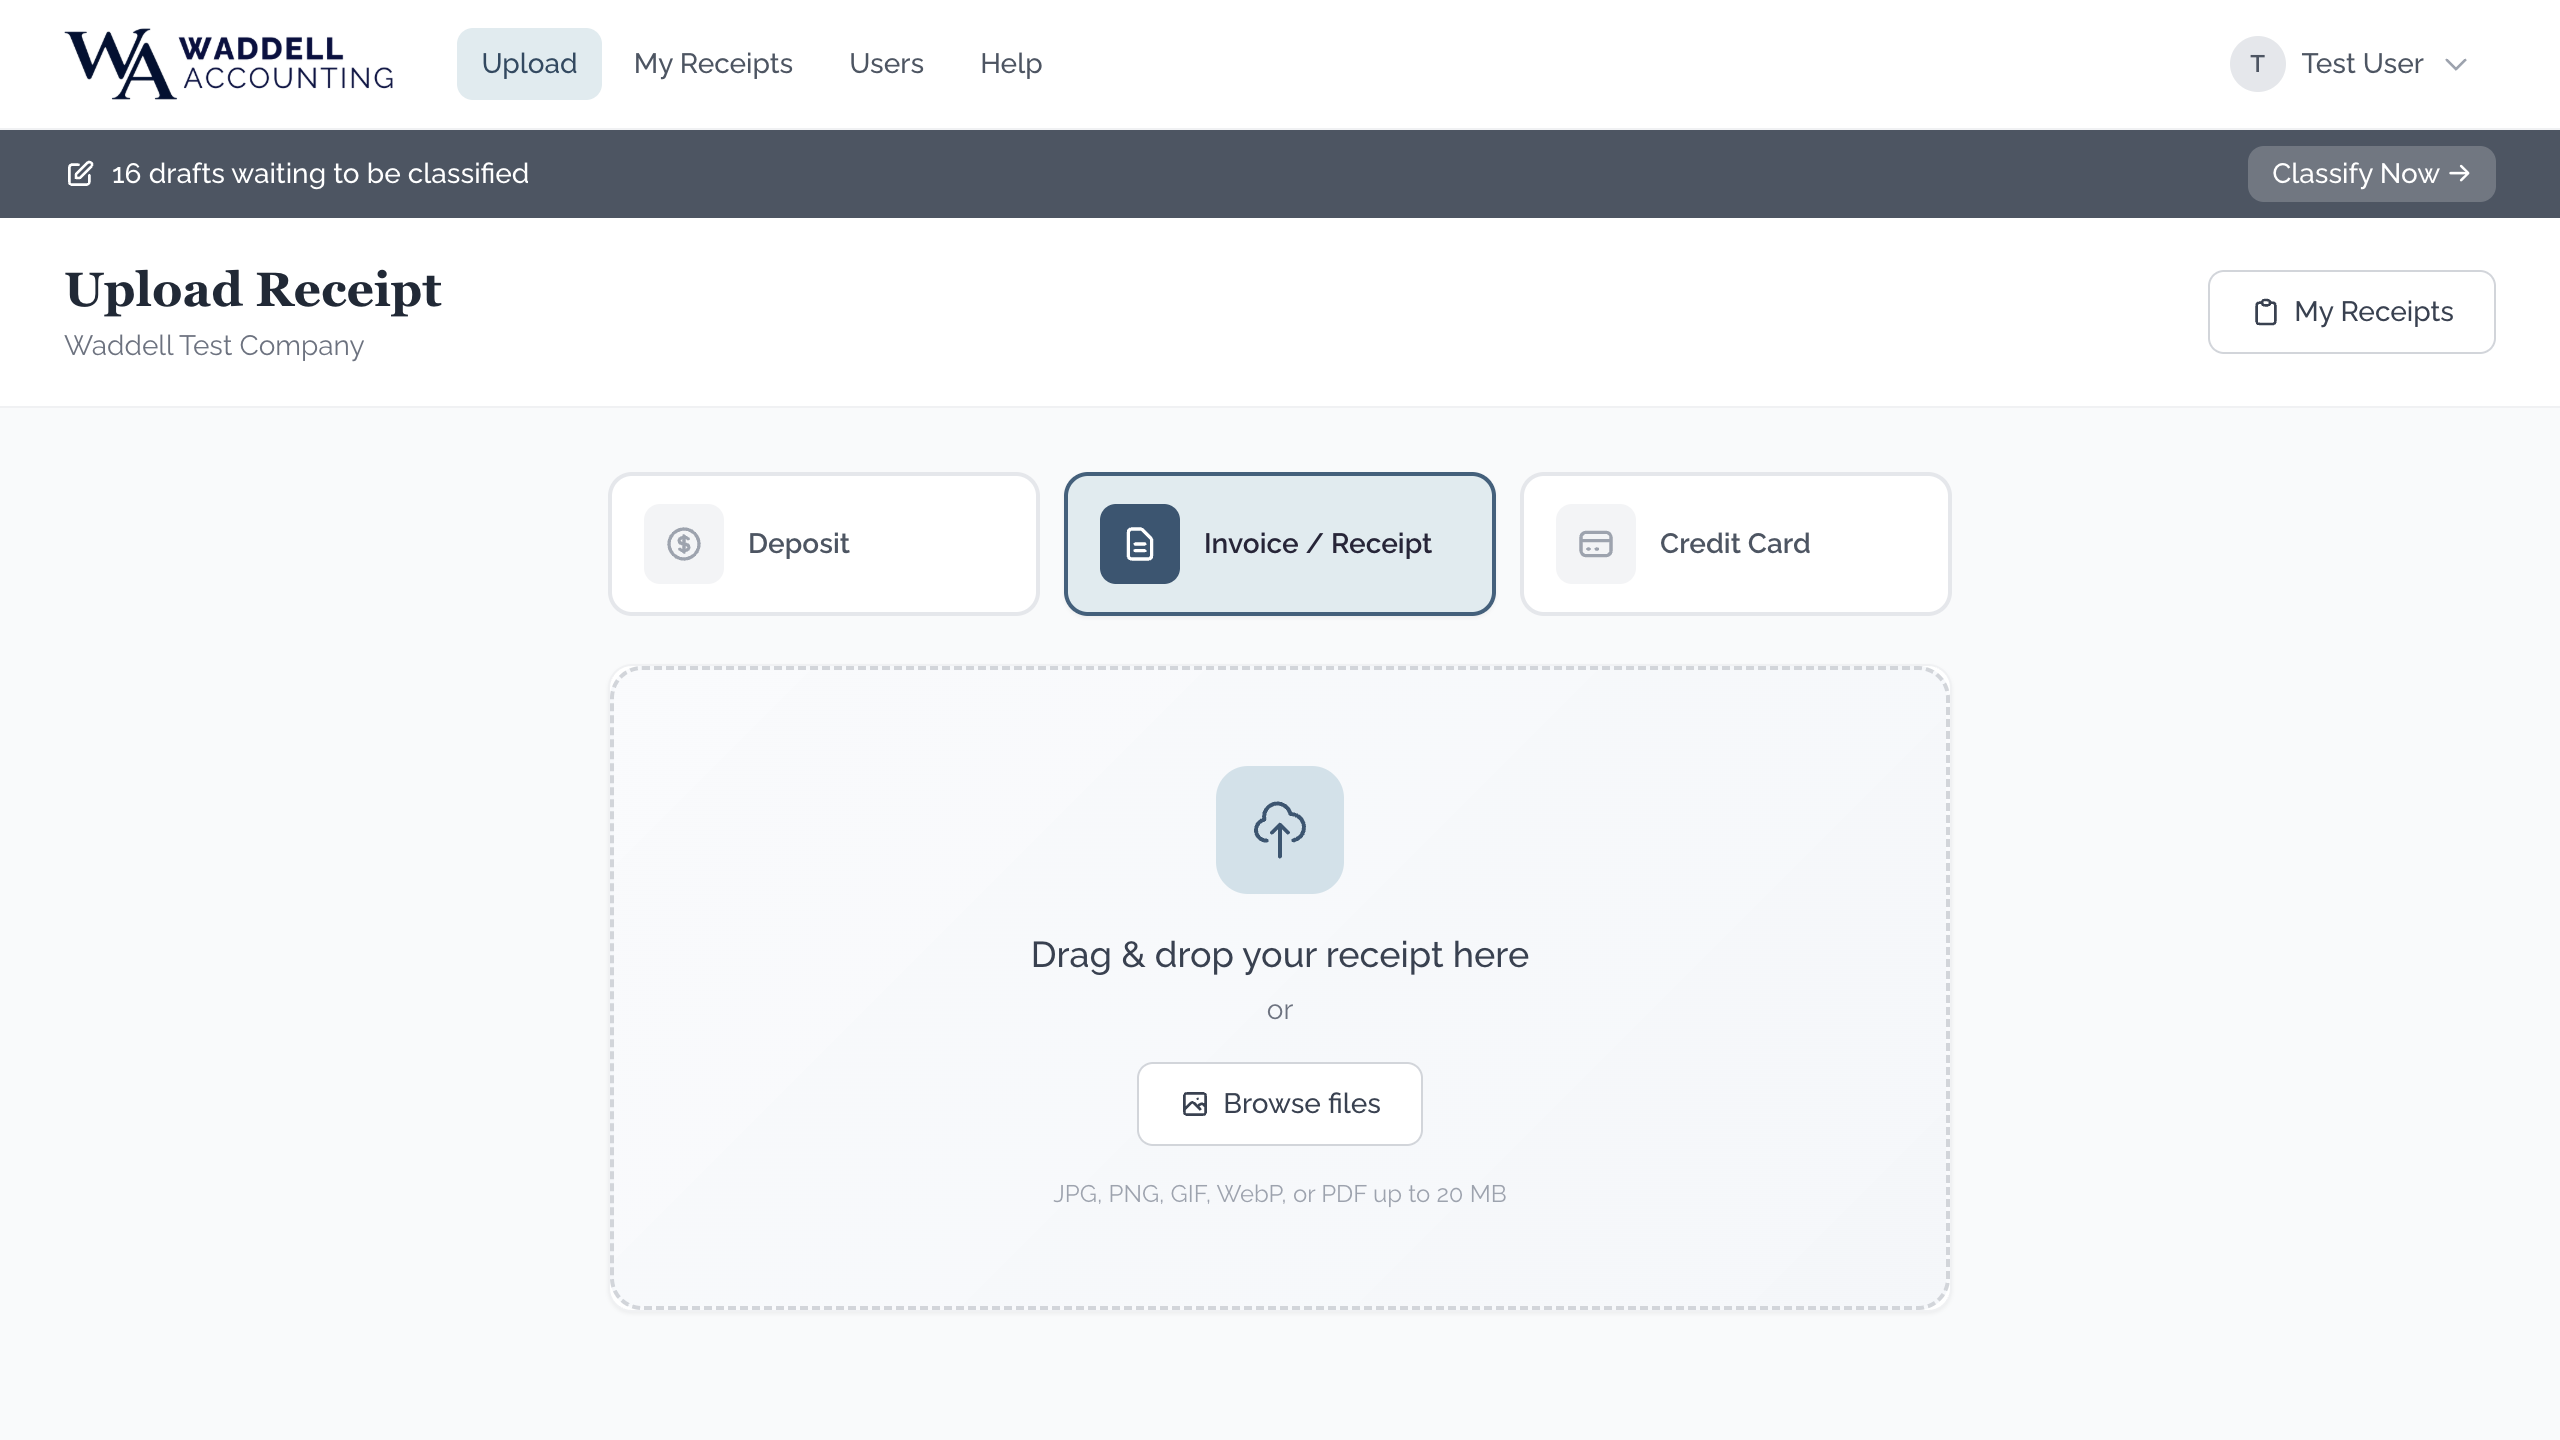
4. Sending a Receipt
On a Computer
- Click "Upload" in the menu bar at the top of the page.
- Choose the type of receipt by clicking the matching button:
- Deposit — money coming in to the parish
- Invoice / Receipt — money going out (a purchase)
- Credit Card — a credit card charge
- Click "Browse Files" to find the picture or PDF on your computer. You can also drag and drop the file onto the dashed upload area.
- A small preview of the file will appear. Make sure it is the right one.
- Click the blue upload button at the bottom (it will say something like "Upload Invoice / Receipt"). A progress bar will show how far along the upload is.
- When the file is sent, the page will move you to the Review page automatically. You can add a memo note there. See Section 5 for what to do next.

On a Phone or Tablet
- Tap the menu icon (three lines ☰) in the top corner to open the menu, then tap "Upload."
- Tap the button for the type of receipt: Deposit, Invoice / Receipt, or Credit Card.
- Tap the upload area in the middle of the screen.
- Choose "Take Photo" to take a new photo with your camera, or "Photo Library" to pick an existing photo.
-
If taking a photo: lay the receipt flat on a table or counter. Use good lighting — natural daylight works best. Make sure all the text, especially the total and date, is sharp and readable.
TipAvoid shadows falling across the receipt. A plain background helps the system read it more accurately.
- Tap the blue upload button at the bottom of the screen and wait while the file is sent.
- You will be taken to the Review page where you can add a memo. See Section 5 for what to do next.
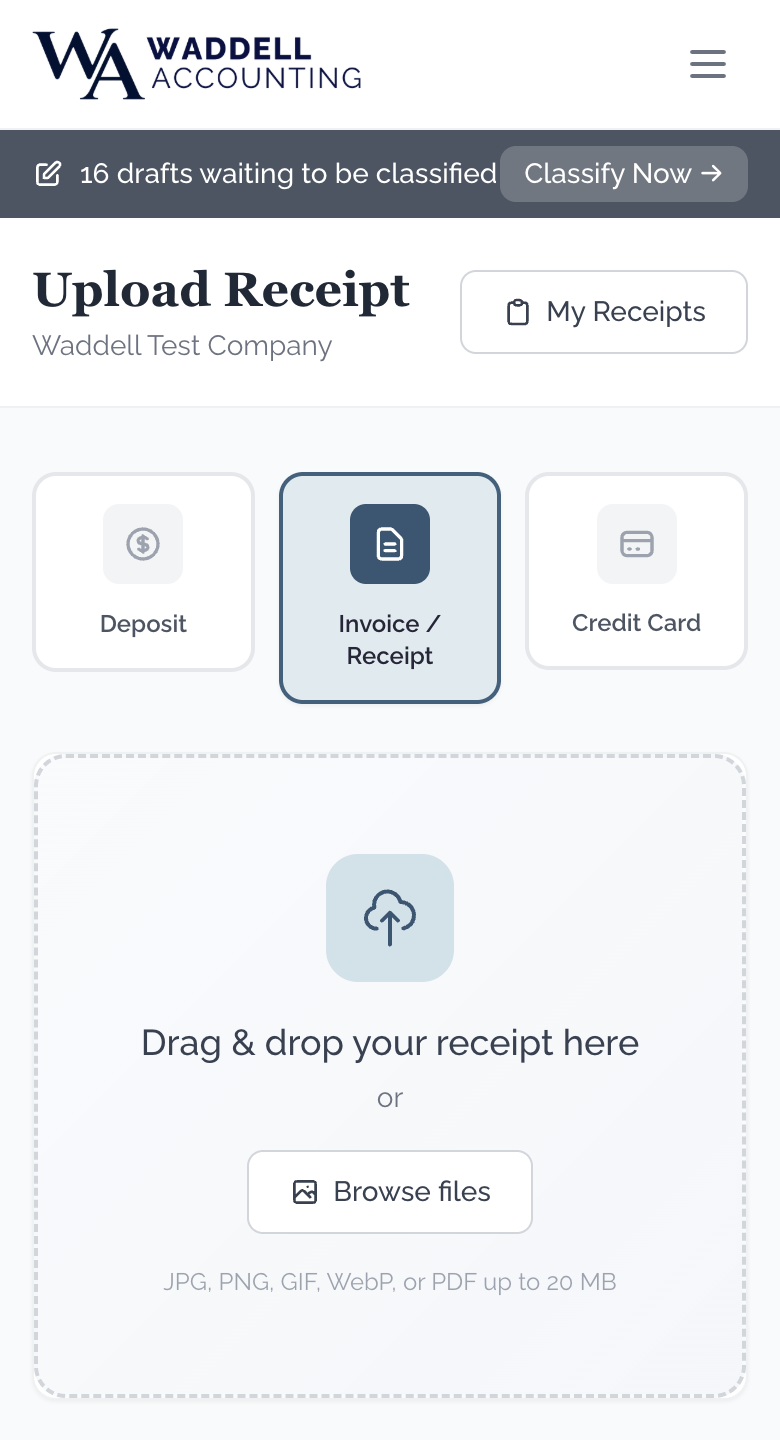
Accepted File Types and Size Limit
- Accepted types: JPEG (.jpg), PNG (.png), GIF (.gif), WebP (.webp), or PDF (.pdf)
- Maximum file size: 20 MB
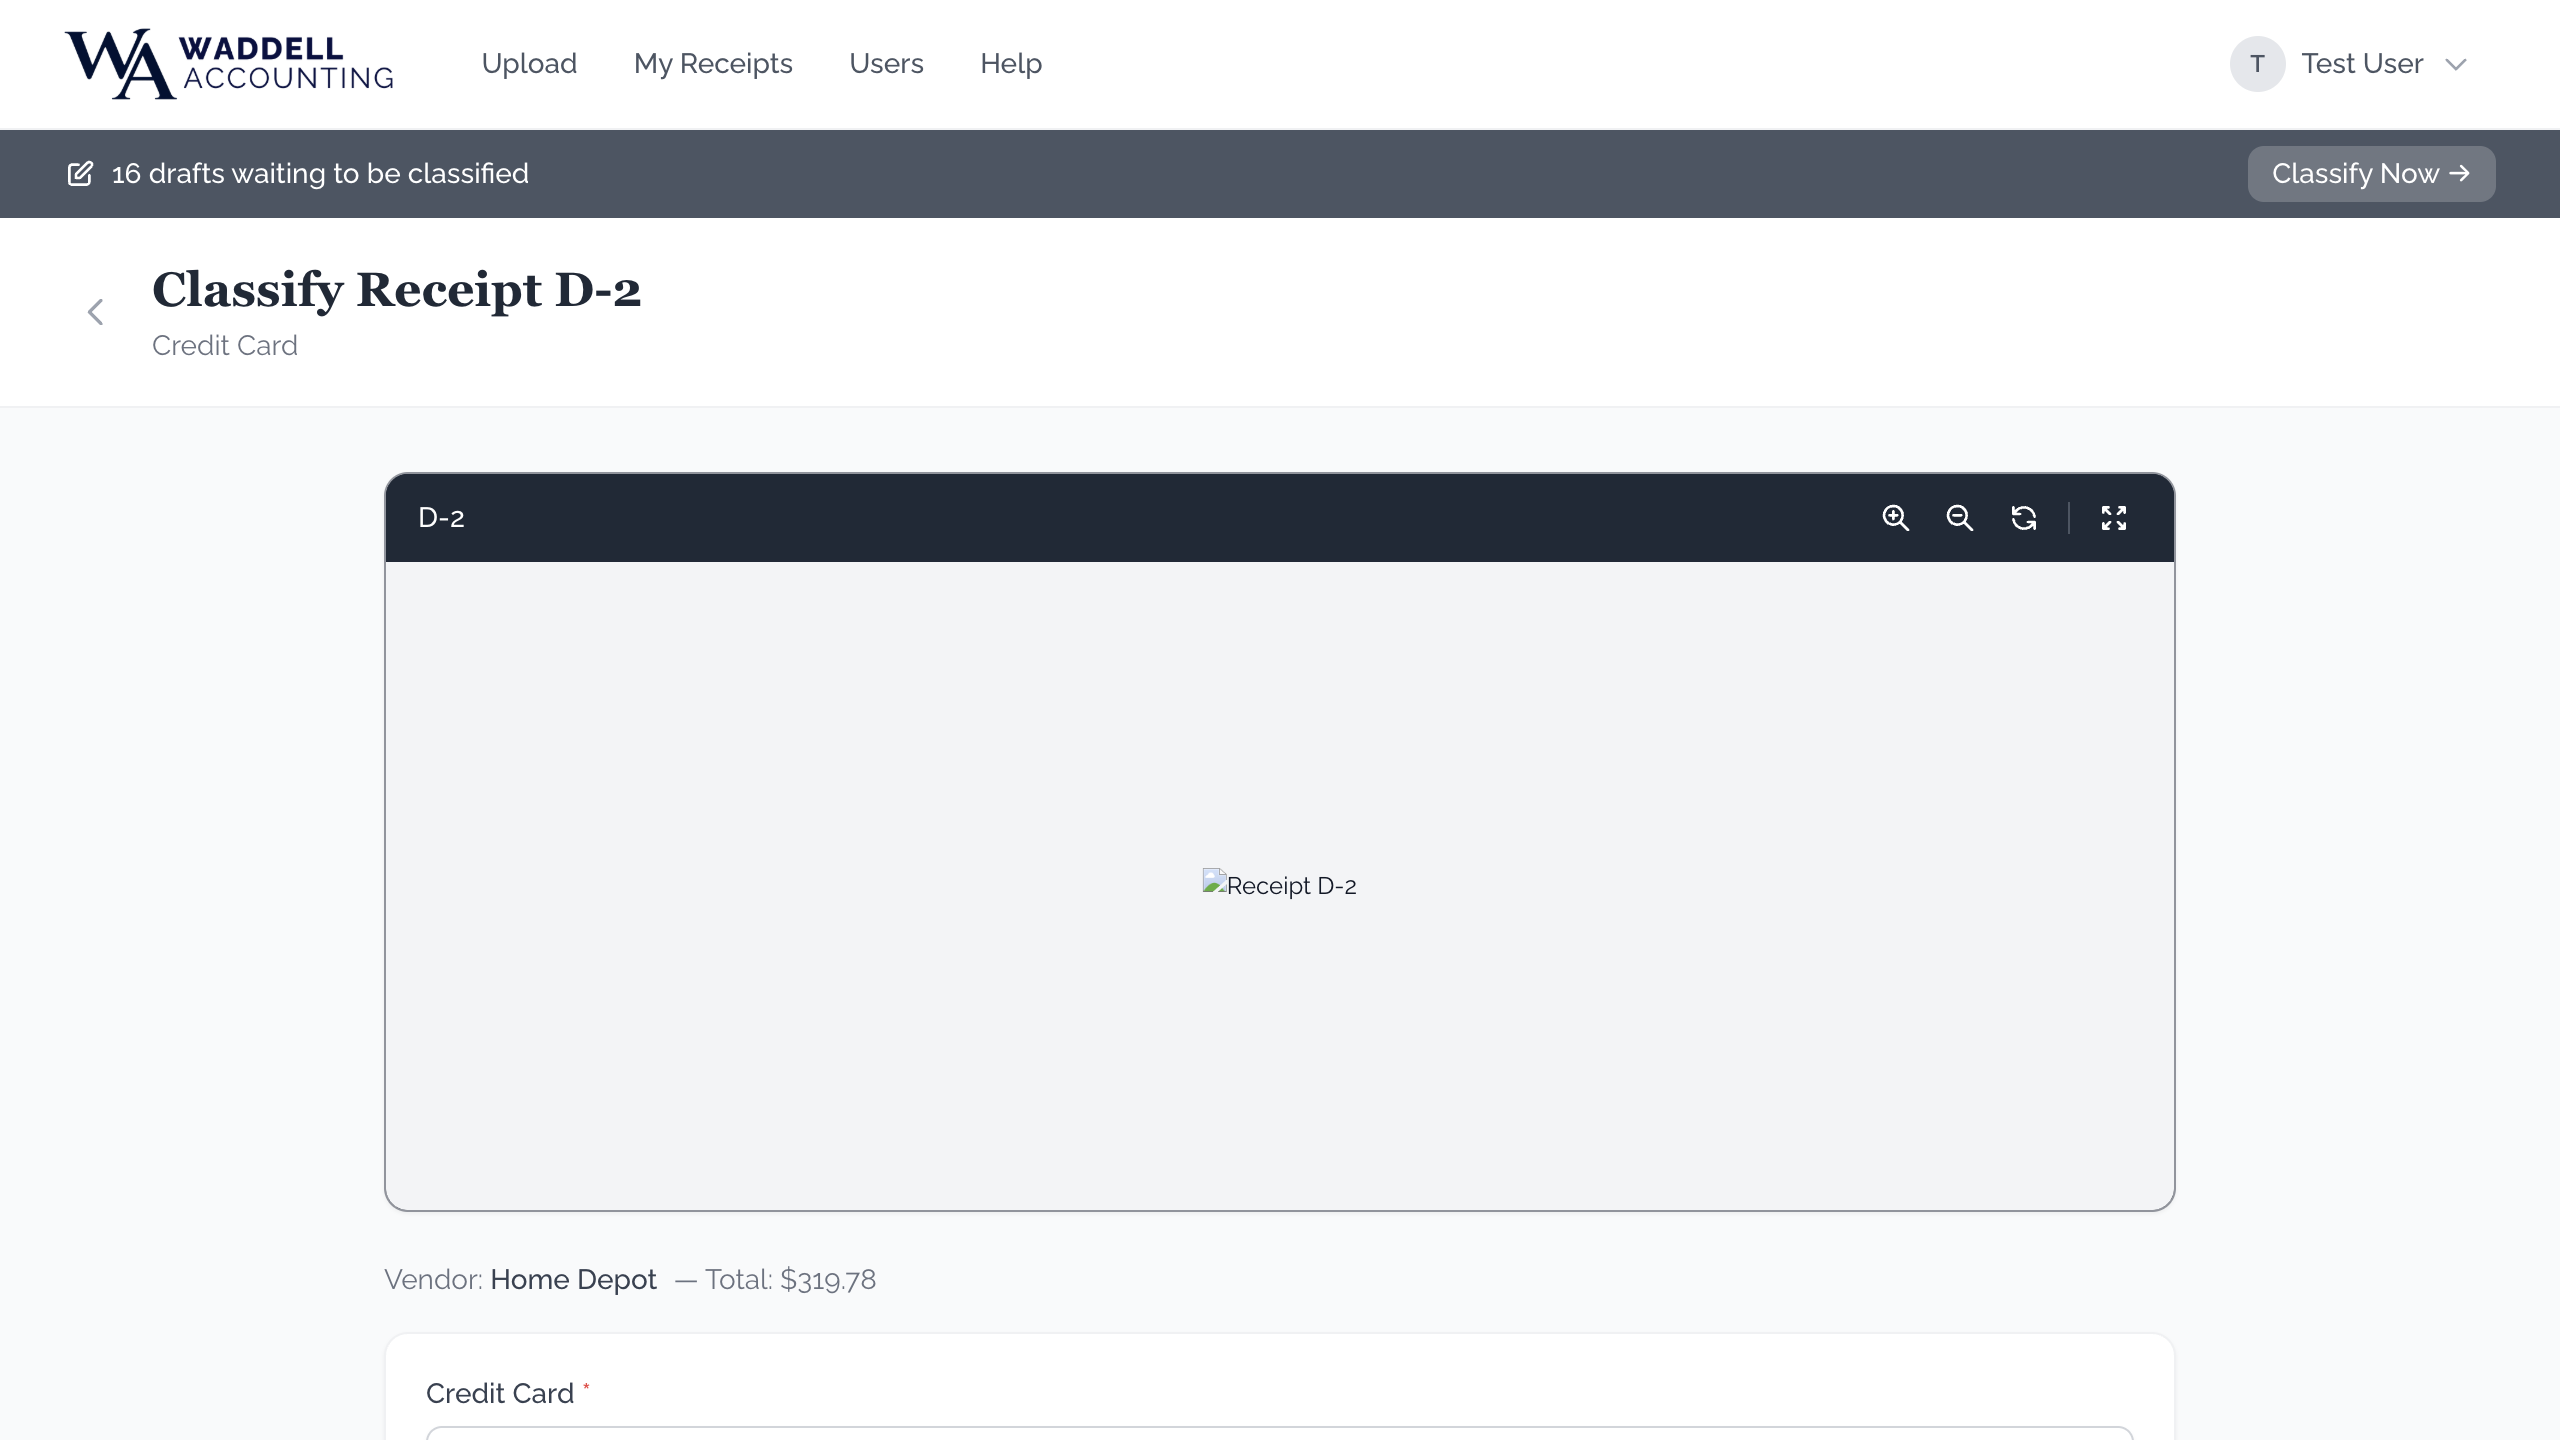
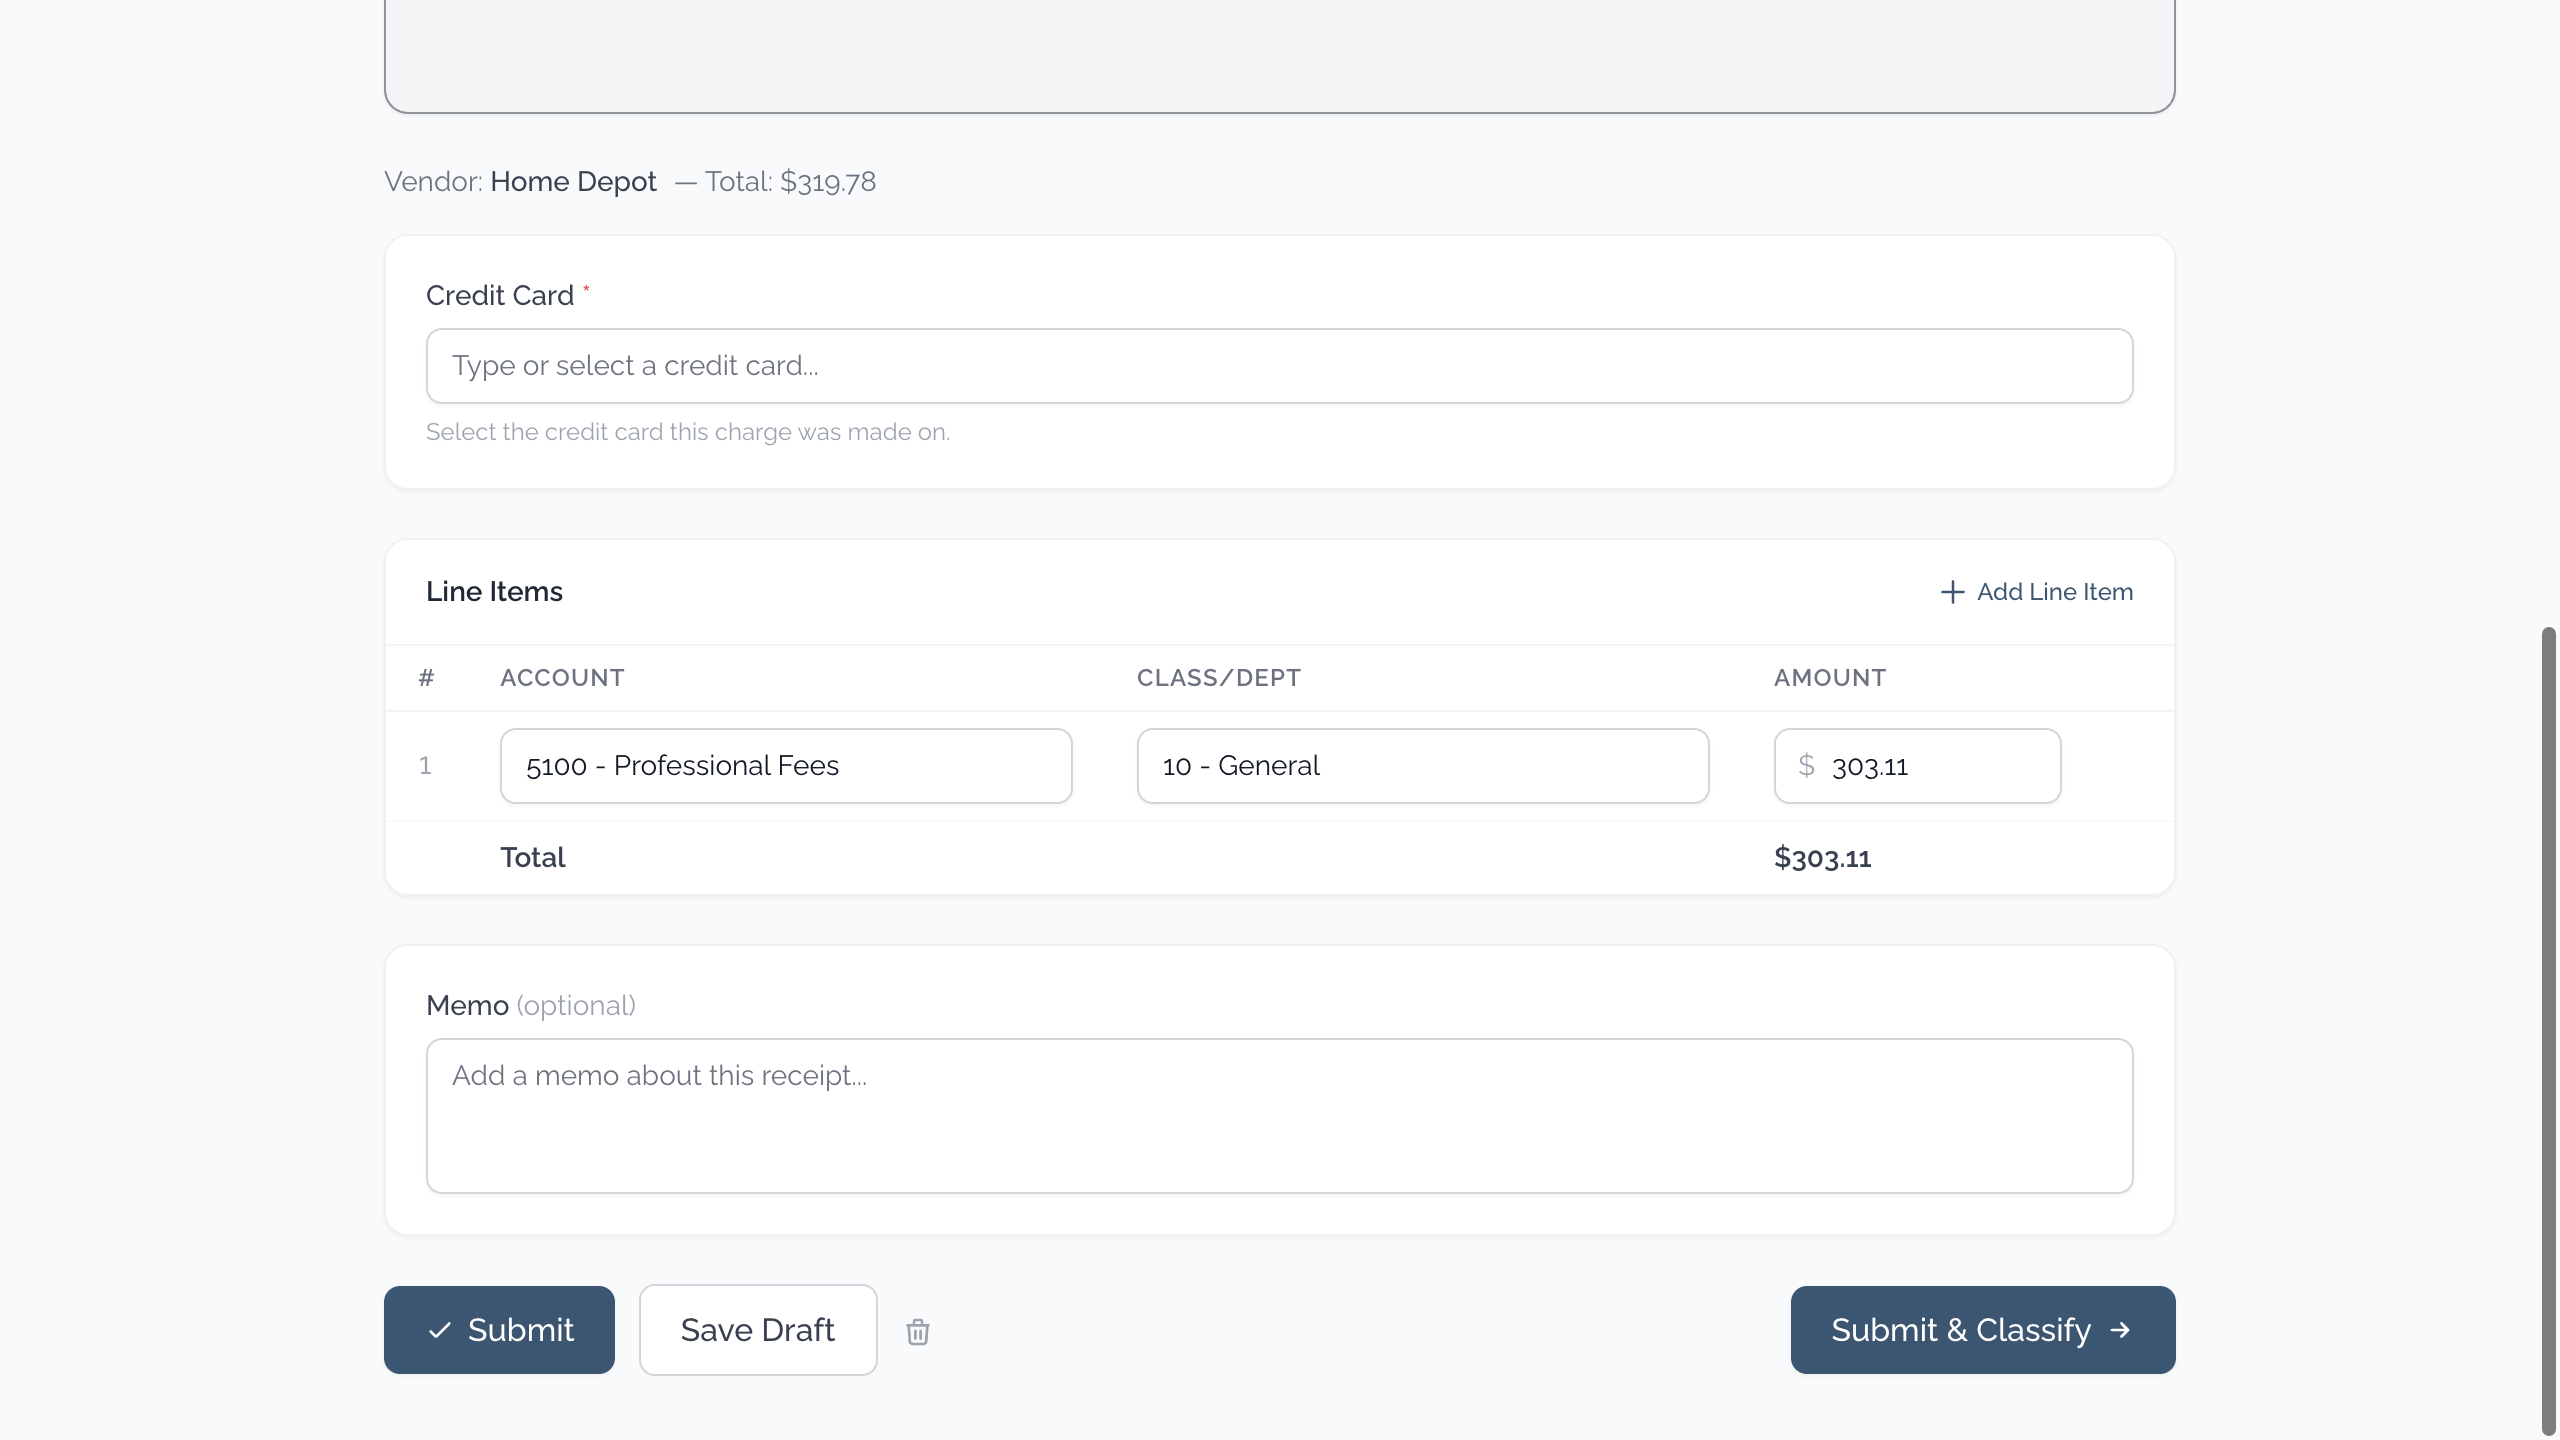
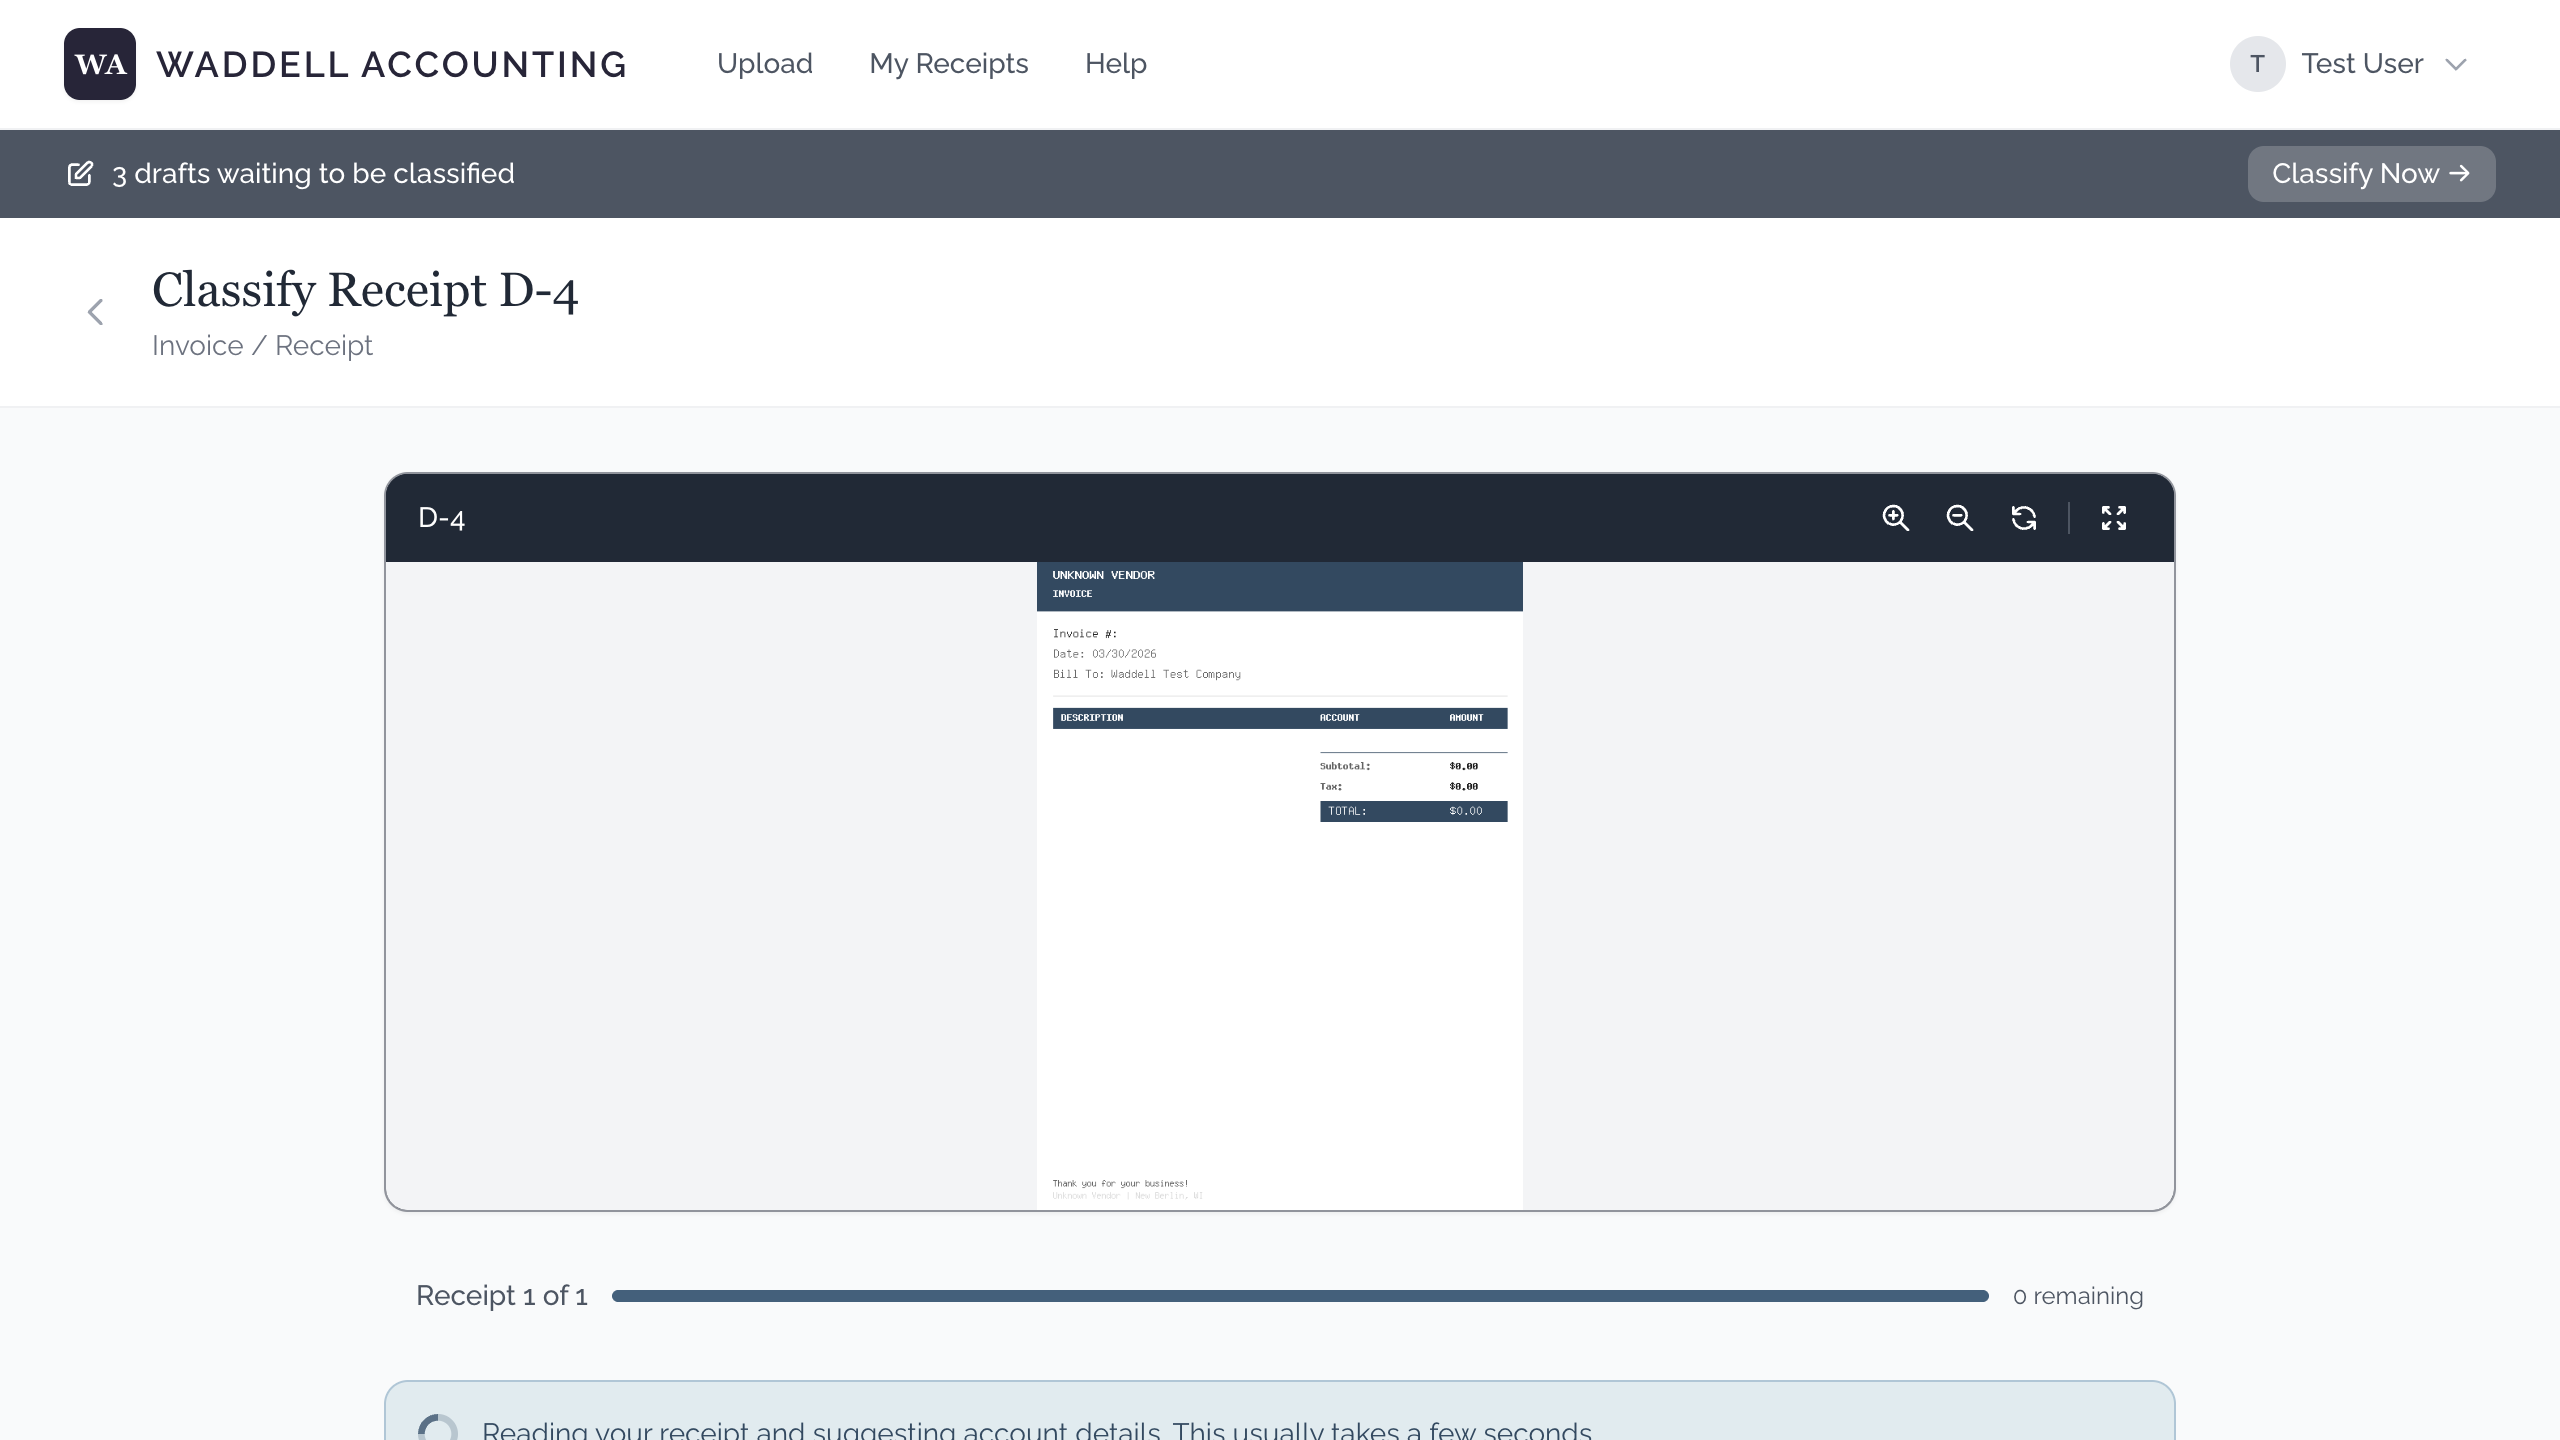
5. Reviewing and Submitting the Receipt
After you send a file, the system automatically reads the receipt and fills in the details for you. All you need to do is look it over and correct anything that looks wrong.
What You Will See on the Review Page
- Vendor name — the store or company. You can click on it to change it if it is wrong.
- Account and Class dropdowns — categories for your accountant. If they are filled in, great. If not, click the dropdown, start typing to search, and press Enter to select the first result.
- Total and Tax — filled in by the system. Shown for your information — you do not need to change them.
- Memo — you can add or edit a note here for your accountant.
The Buttons at the Bottom
- Submit — sends the receipt to your accountant right away.
- Submit & Classify — sends the receipt and automatically opens the next draft receipt for review. This button only appears when you have more drafts waiting.
- Save Draft — saves your work so you can come back and finish it later. The receipt will show a "Draft" status in your list.
On a Phone or Tablet
The Review page works the same way on a phone or tablet. A few things to keep in mind:
- The receipt image or PDF appears at the top of the page. Scroll down to see the form fields below it.
- When tapping a dropdown (like Account or Class), start typing to narrow the list — this works better than scrolling through all the options on a small screen.
- If the on-screen keyboard covers the Submit button, scroll down or tap somewhere else first to dismiss it.
- You can start reviewing on your phone and finish on a computer (or the other way around) — your work is saved automatically.
6. Sending Several Receipts at Once (Batch Mode)
If you have a stack of receipts to send, Batch Mode lets you send all of them first and then review them one by one. This is very handy when you have several receipts to submit at the end of the month.
How to Start a Batch
- Go to the Upload page as usual.
- Choose your receipt type and select your file.
- Before clicking the upload button, check the small box that says "Take Another."
- Click the upload button to send the first receipt.
- A blue "Batch Mode" bar will appear at the top of the page. This tells you that Batch Mode is on and shows how many receipts you have sent so far.
- You will be returned to the Upload page to send the next receipt. Keep the "Take Another" box checked for each receipt.
- When you are done, you have two options: uncheck "Take Another" before uploading your last receipt, or click the "Done Uploading" button in the blue Batch Mode bar at the top of the page. Either way, the system will take you to review your receipts.
Reviewing Your Batch
After your last file is sent, the system will take you to the Review page for the first receipt. At the top you will see a progress bar that says something like "Receipt 2 of 5."
- Review the details for each receipt and correct anything that looks wrong.
- Click "Submit & Classify" to send it to your accountant and move to the next receipt.
- Repeat until you have reviewed all receipts in your batch.
Batch Mode on a Phone or Tablet
Batch Mode is especially useful on a phone because you can quickly snap photos of several receipts in a row:
- Each time you send a receipt with "Take Another" checked, you will be taken right back to the upload page.
- Tap "Choose File" and select "Take Photo" to use your camera for the next receipt — no need to save photos first.
- When you are done, either uncheck "Take Another" before your last upload, or tap "Done Uploading" in the blue bar at the top.
- The Review page works the same as on a computer. Scroll down to see the form fields below the receipt image.
If You Need to Take a Break
If you need to step away before you have finished reviewing, that is fine. Your receipts are saved.
- When you come back, you will see an amber (golden yellow) bar at the top of the page that says how many receipts are still waiting to be reviewed.
- In your "My Receipts" list, receipts that still need to be reviewed will have a blue dot next to them.
- You can resume from any computer or phone — not just the one you started on.
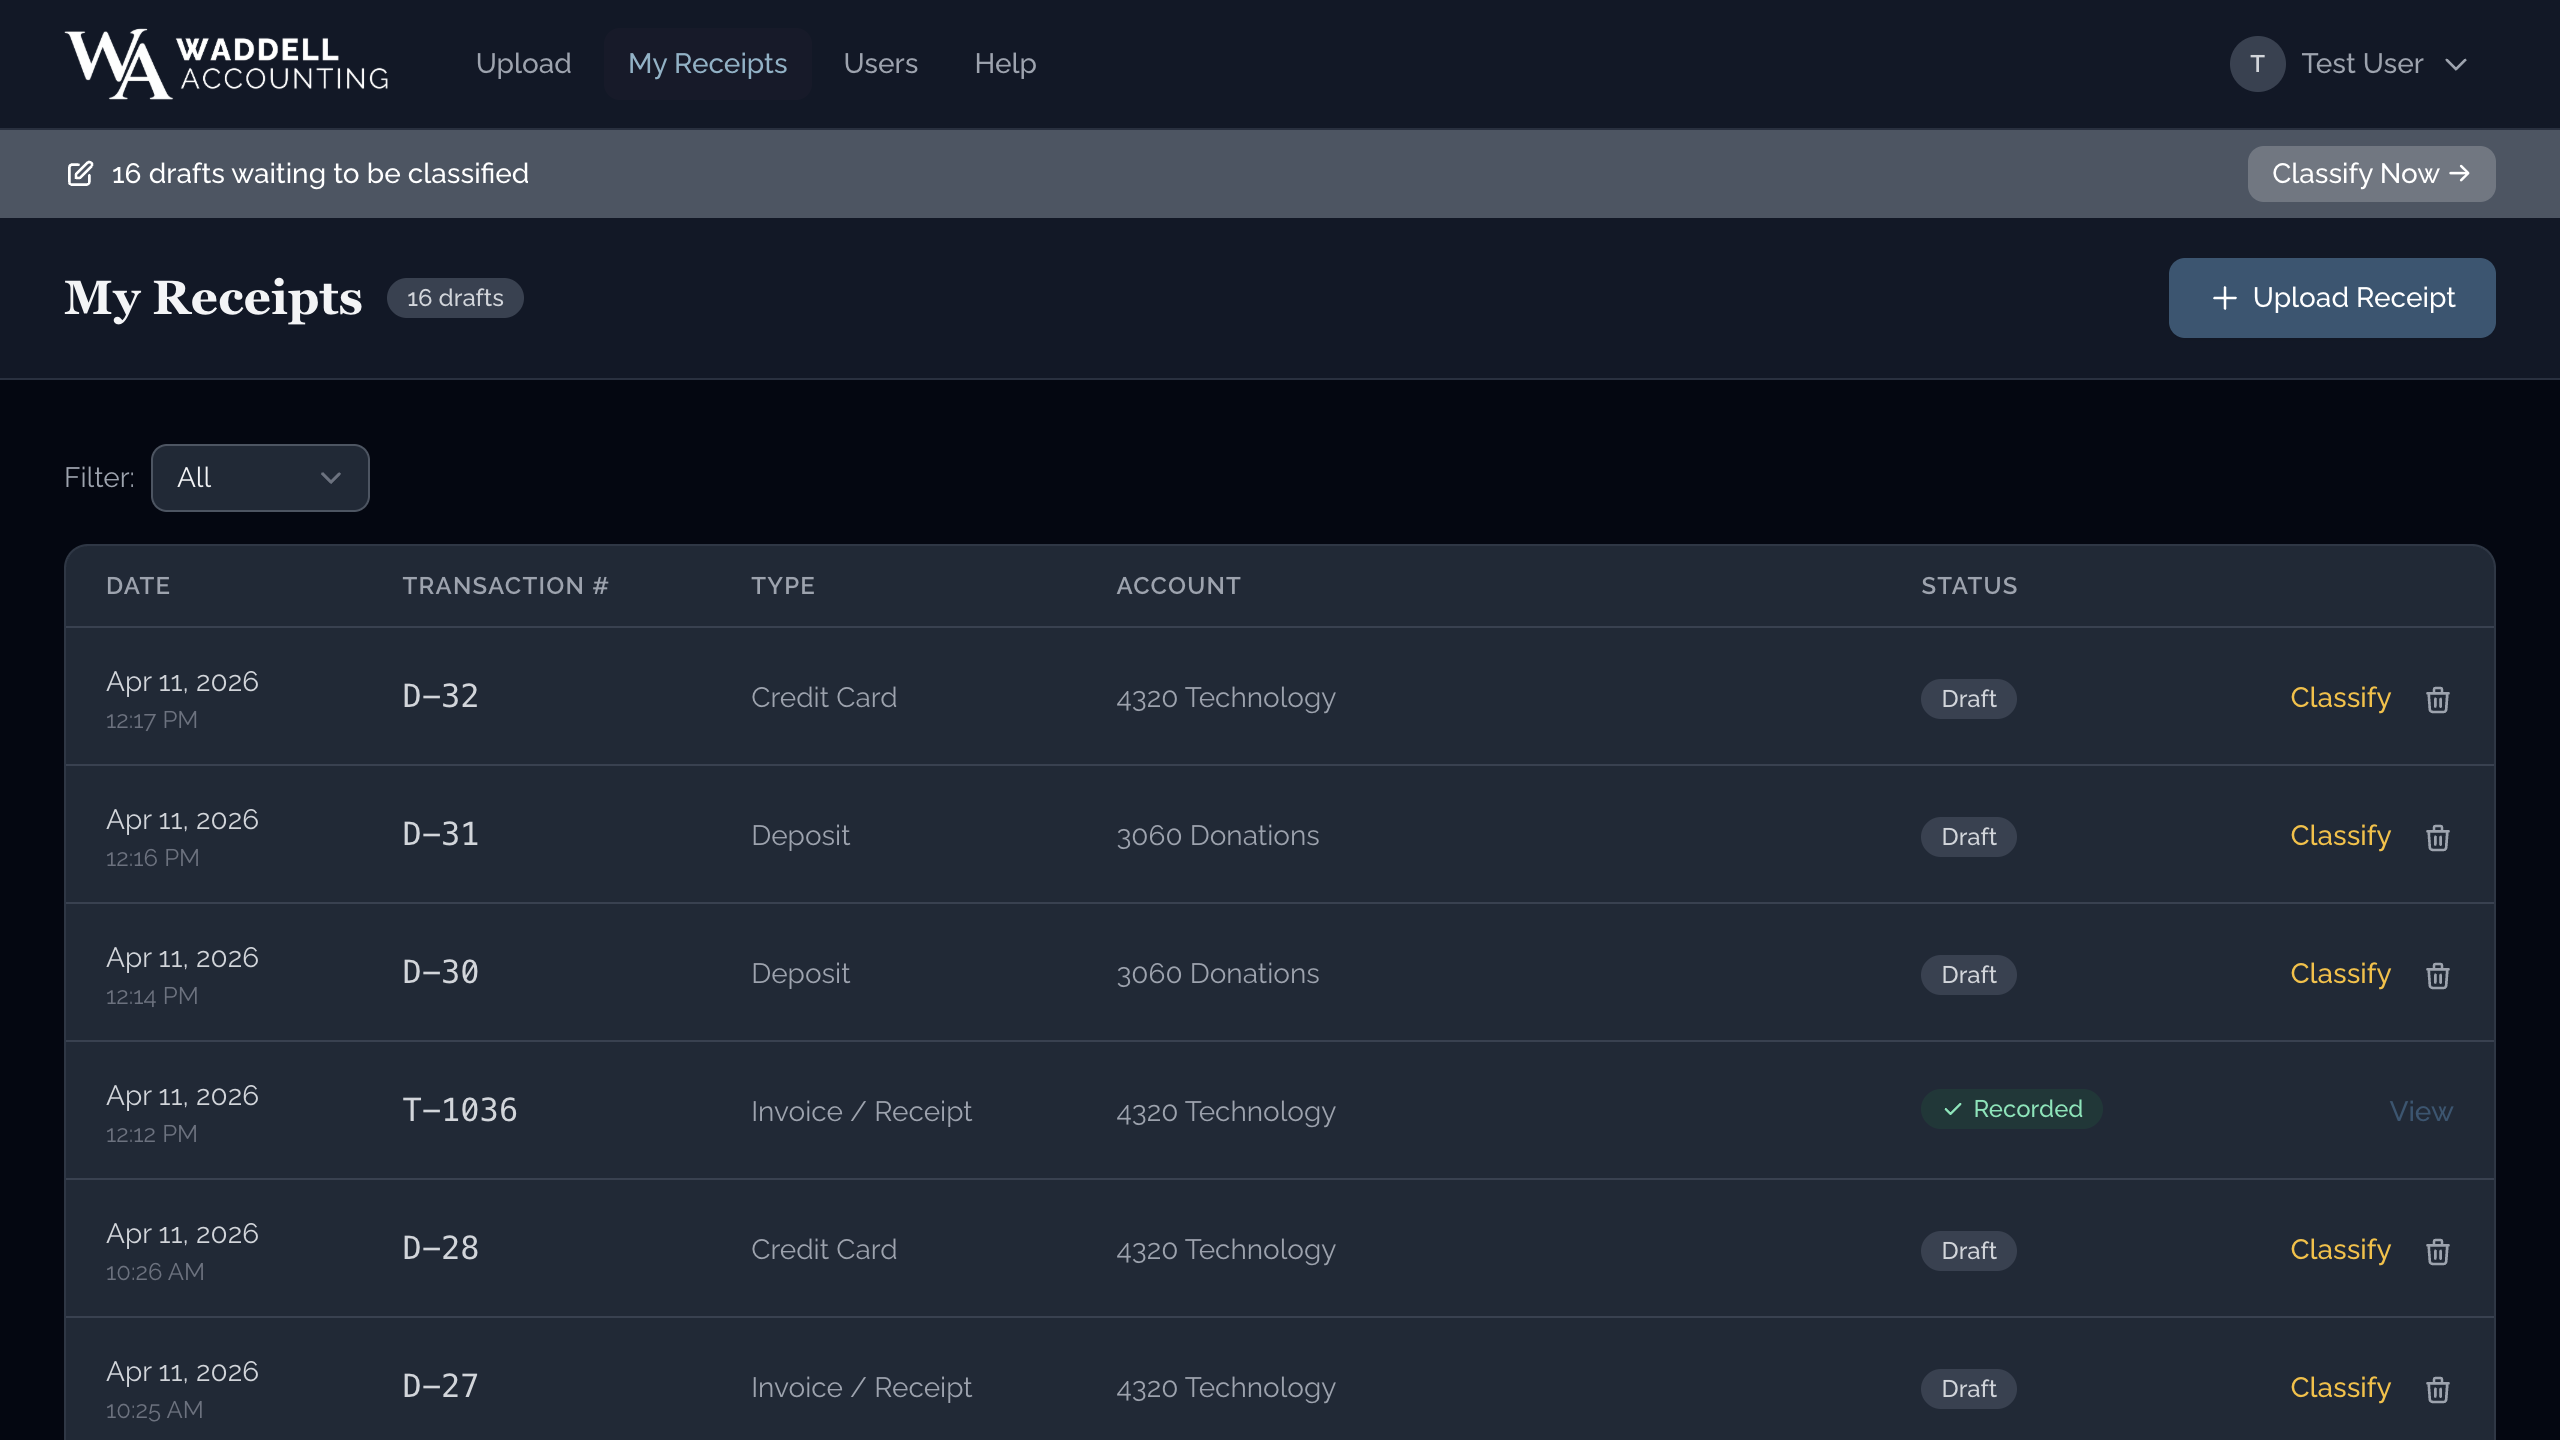
7. Viewing Your Receipts
On a Computer
- Click "My Receipts" in the menu at the top of the page.
- You will see a list of all your receipts.
- Each row shows the date you sent it, the store name, the type, and the status.
- Click "View" on any row to see the full details.

On a Phone or Tablet
- Tap the menu icon (☰) in the top corner.
- Tap "My Receipts."
- You will see cards for each receipt. Tap any card to see the full details.
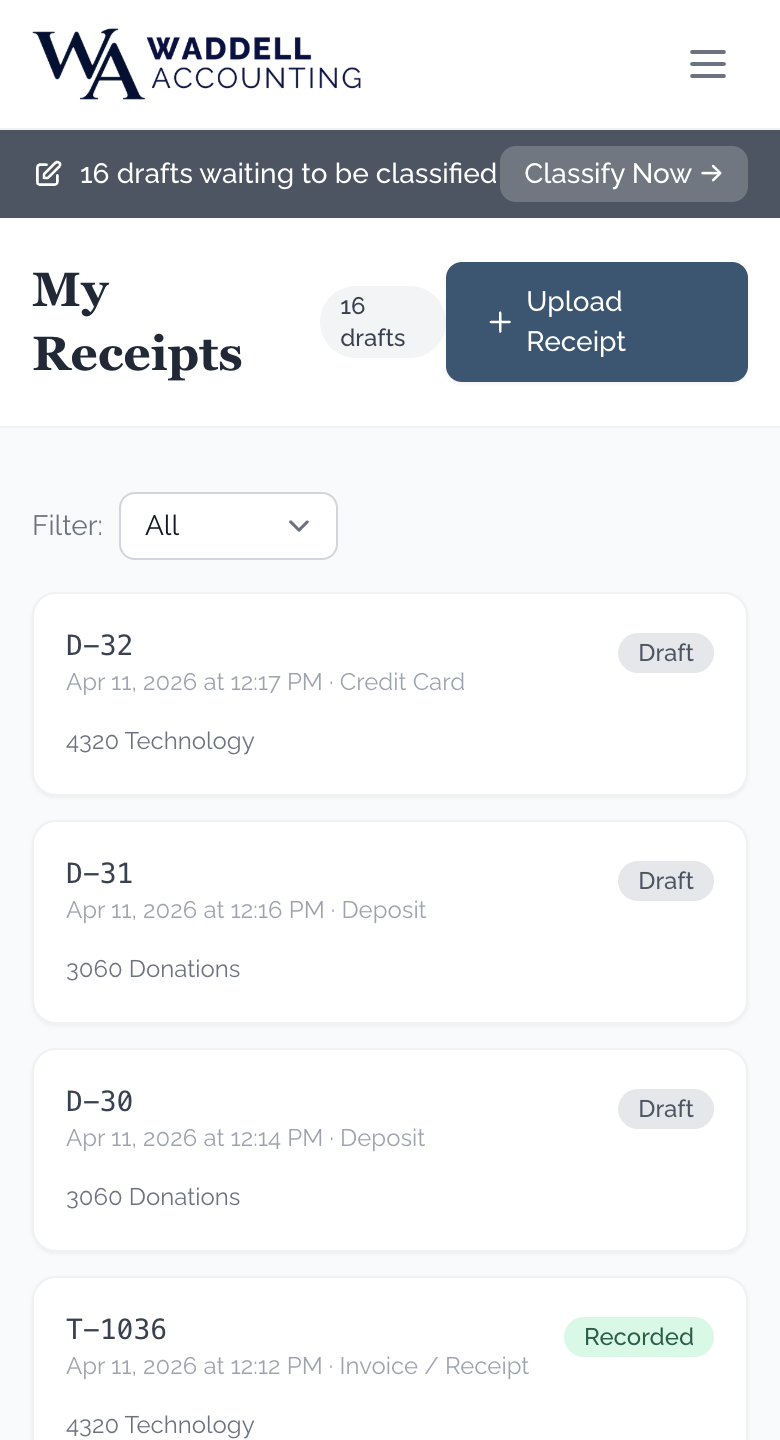
Understanding the Status Labels
Each receipt has a colored status label. Here is what each one means:
| Label | What it means |
|---|---|
| Draft | You have sent the picture, but have not yet reviewed and submitted it. Draft receipts are numbered D-1, D-2, etc. You can delete a draft directly if you no longer need it. |
| Pending | You have submitted the receipt and it is waiting for your accountant to record it. Submitted receipts are numbered T-1001, T-1002, etc. If you need to remove a pending receipt, you can request a deletion and your accountant will approve it. |
| Recorded | Your accountant has reviewed and recorded this receipt in QuickBooks. No further action is needed from you. |
| Flagged | Your accountant has a question about this receipt. Contact your accountant to find out what they need. |
| Deleted | This receipt has been deleted. It stays visible in your list (shown in grey) so you have a record that it existed, but it will not be recorded by your accountant. |
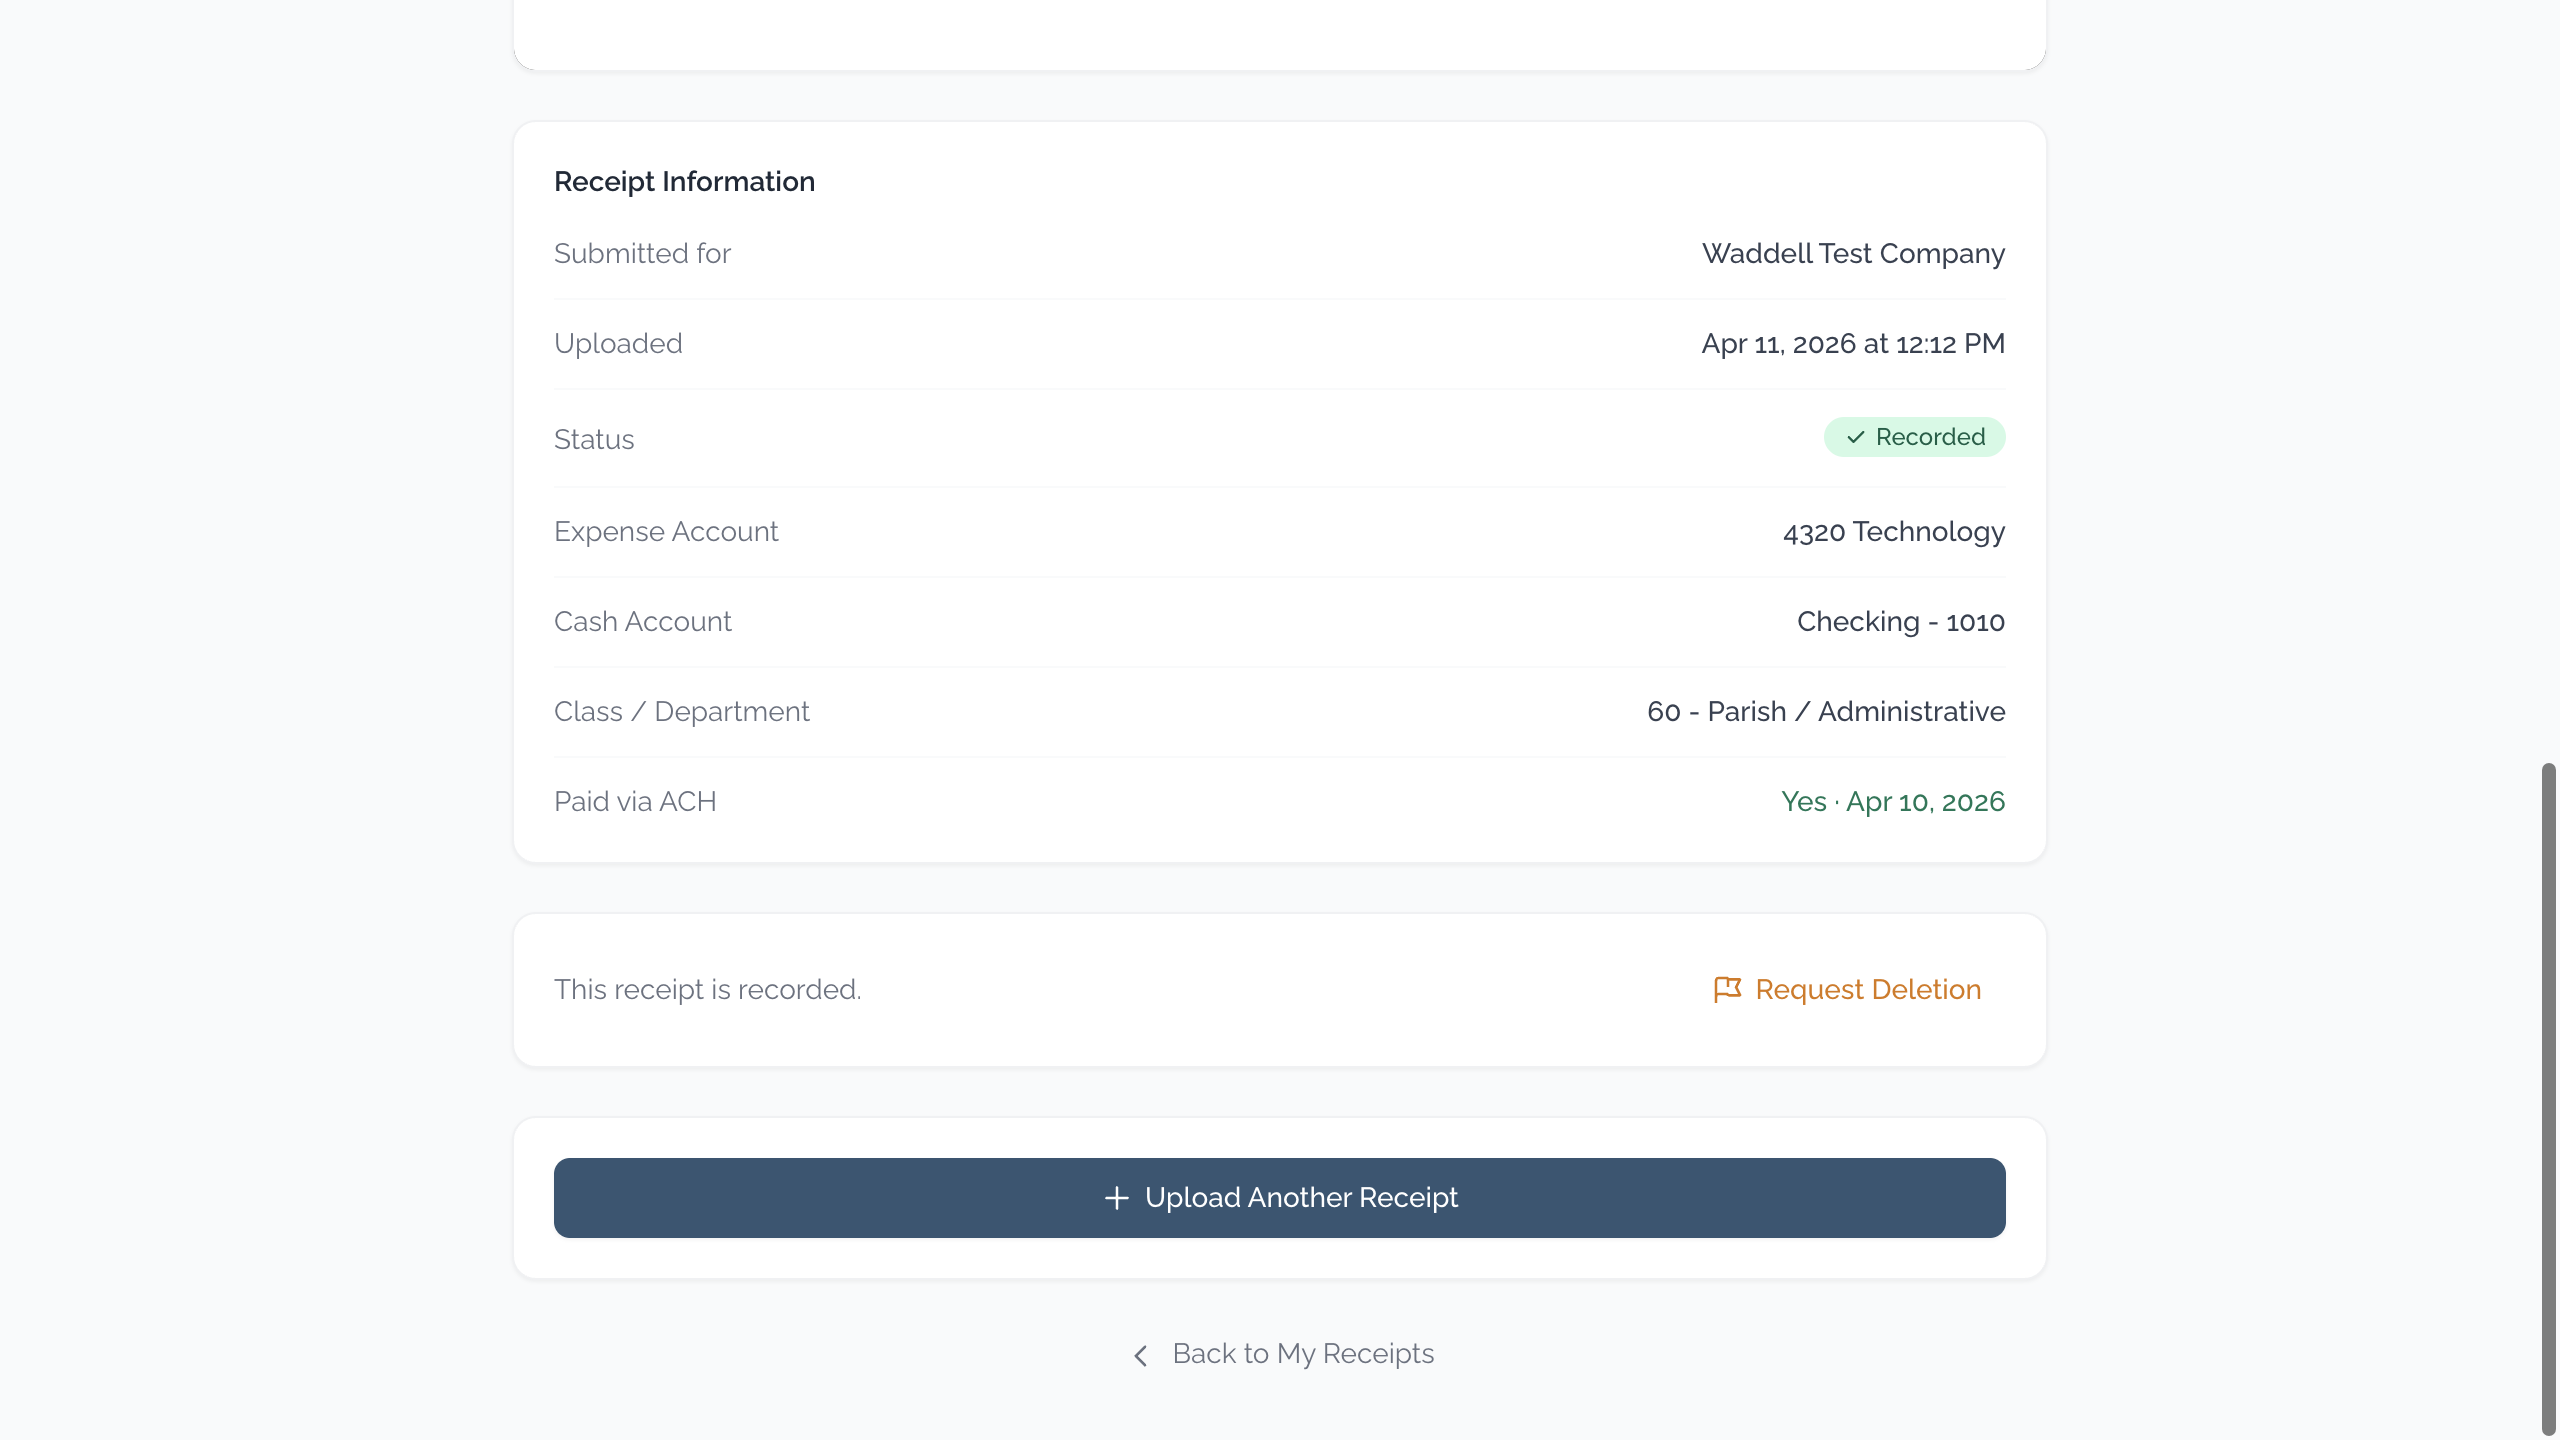
8. Viewing Receipt Details
- From "My Receipts," click or tap a receipt to view its details.
- You will see a picture of the receipt (or a link to view the PDF if you uploaded a PDF).
- For pictures: click or tap the image to make it larger. Click or tap again to go back to normal size.
- For PDFs: click or tap "Open PDF" to view the file in a new window.
- Below the image you will see the transaction number, type, status, and any other details the system read from your receipt.
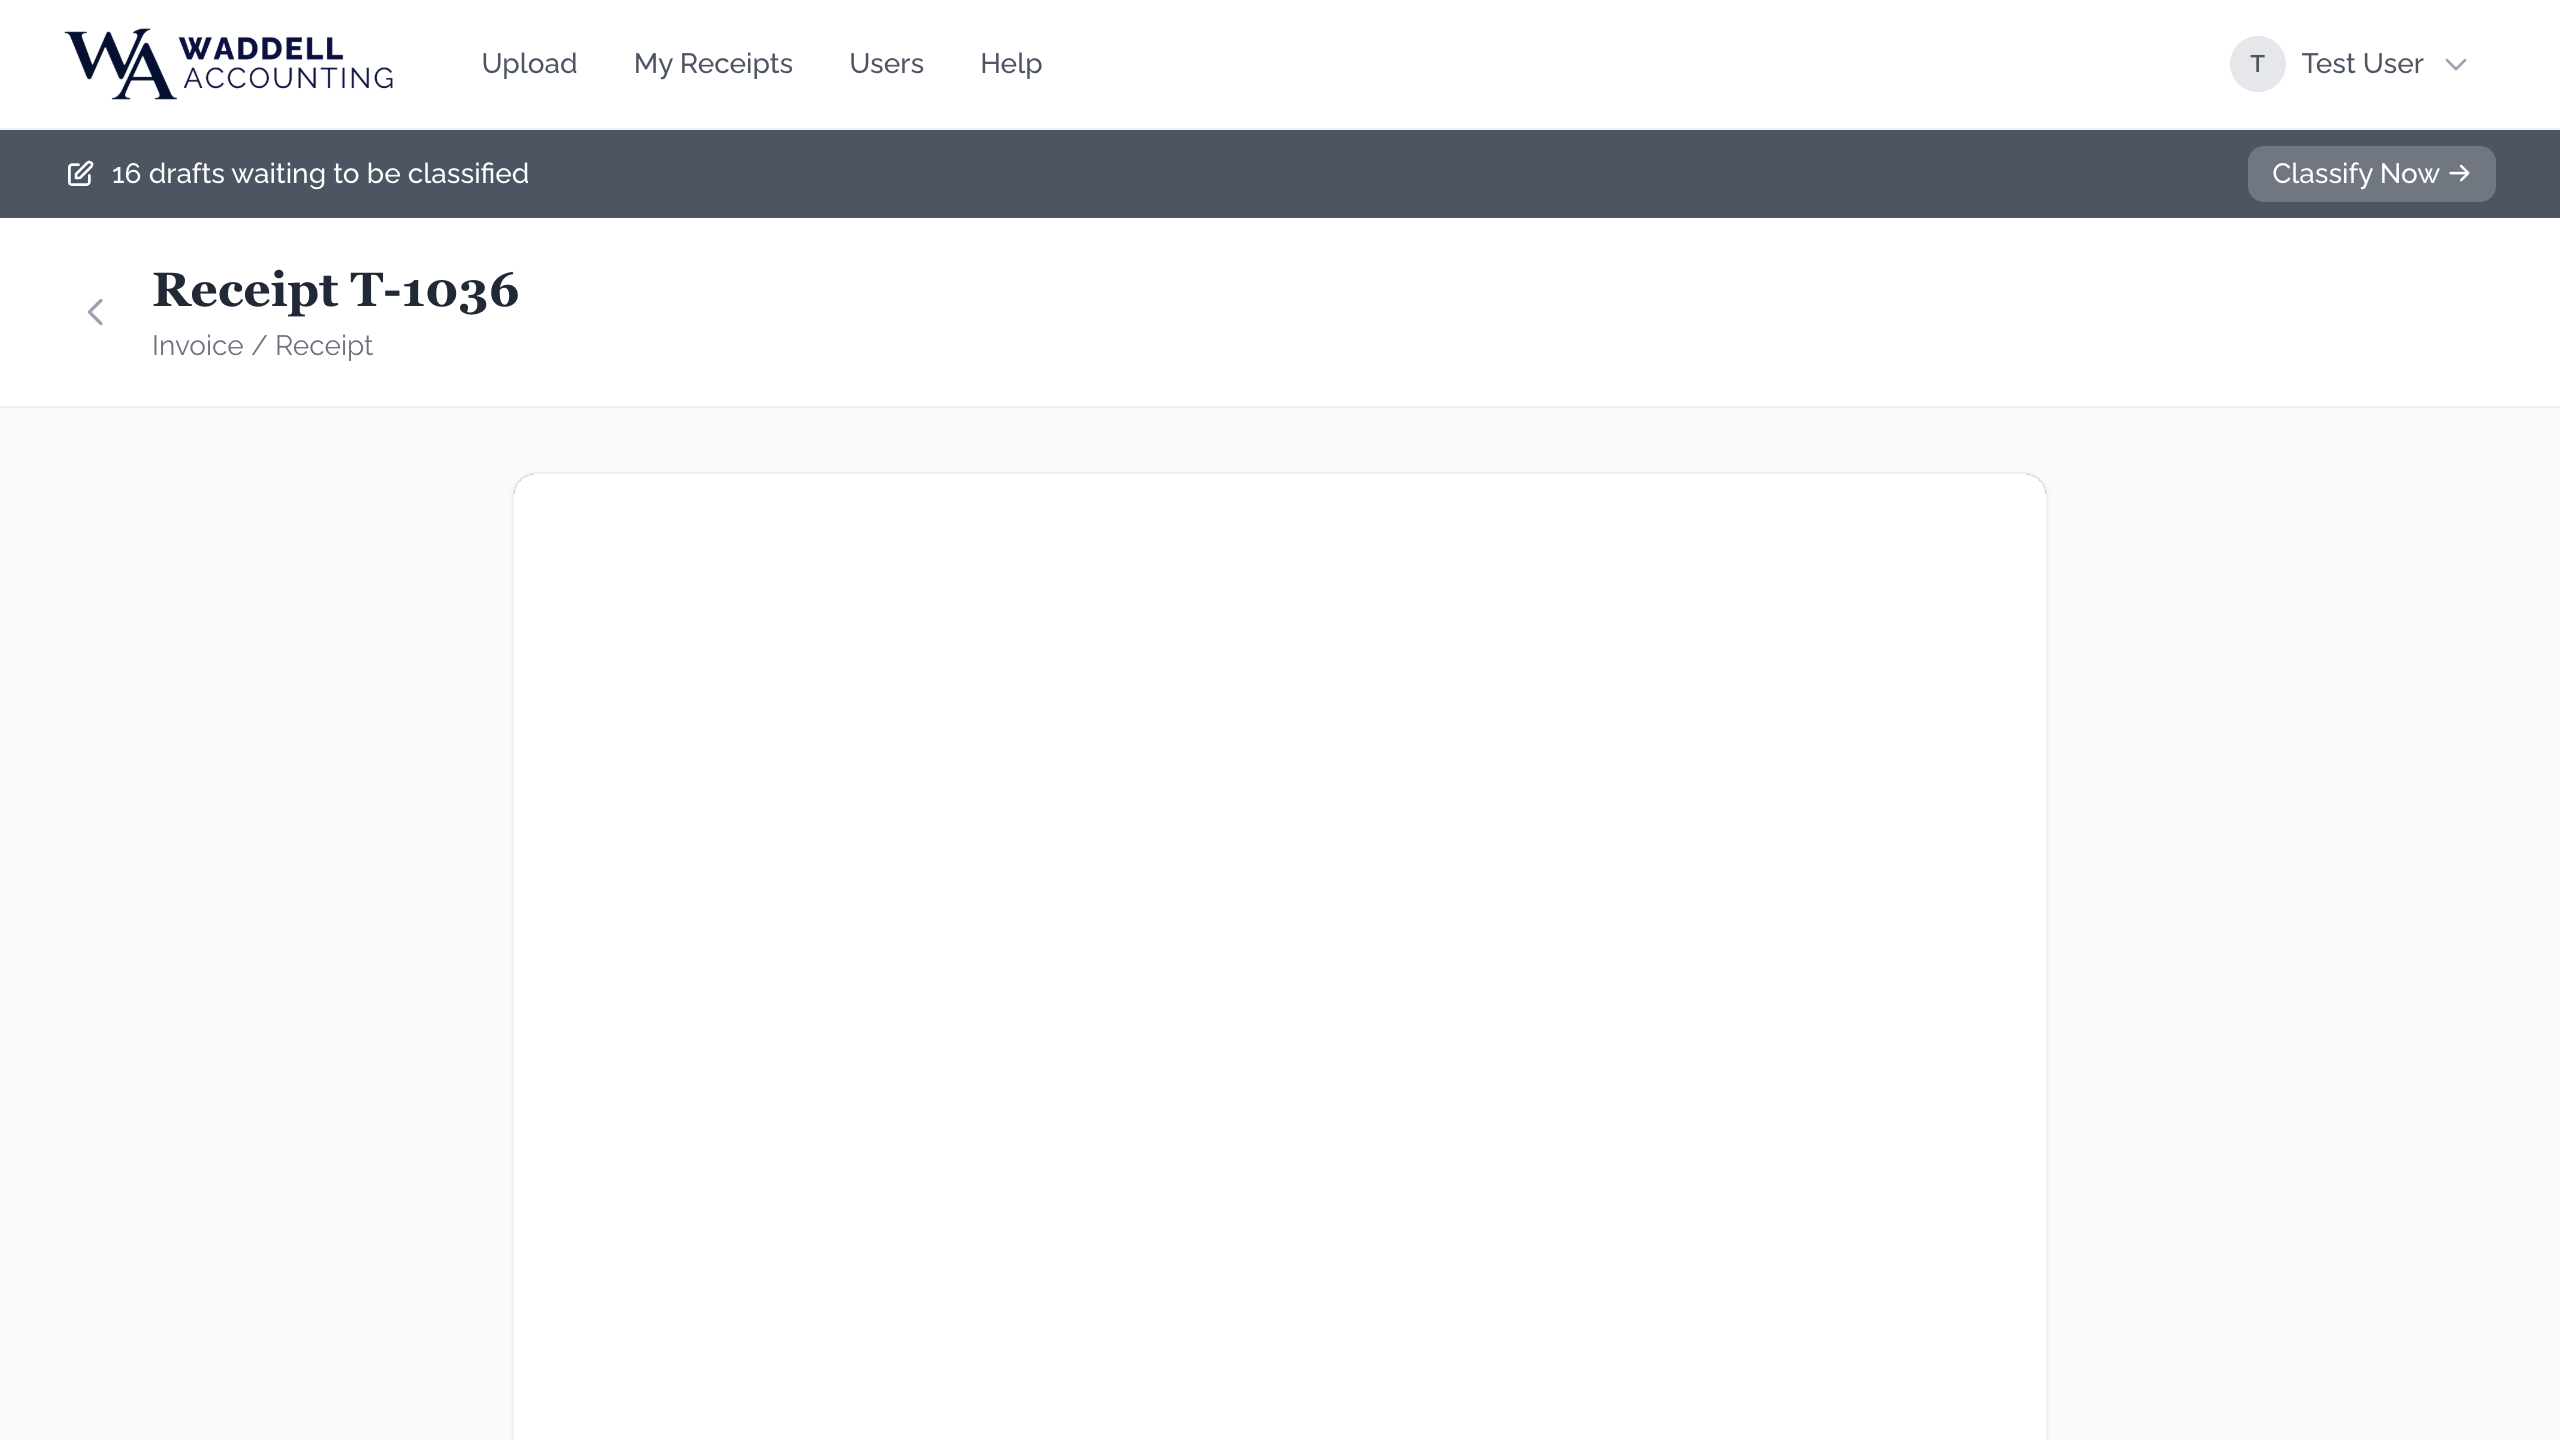
Upload Another Receipt
At the bottom of the receipt detail page, you will find an "Upload Another Receipt" button. Click it to go straight back to the upload form without navigating through the menu.
On a Phone or Tablet
On a smaller screen, the page is stacked vertically — the receipt image at the top and the details below.
- For images, tap the image to see a larger version. Use pinch-to-zoom if you need to read small text on the receipt.
- For PDFs, tap "Open PDF" to view the file in your browser or PDF reader.
- Scroll down to see the transaction number, type, status, and other details.
Deleting a Draft Receipt
If a receipt shows a status of Draft (numbered D-1, D-2, etc.) and you want to remove it:
- Open the receipt detail page.
- Click or tap the "Delete" button.
- A warning will appear asking you to confirm. Click or tap "Confirm" to delete it.
Requesting Deletion of a Submitted Receipt
If a receipt shows a status of Pending (numbered T-1001, T-1002, etc.) and you need to remove it:
- Open the receipt detail page.
- Click or tap "Request Deletion."
- Your accountant will review and approve the deletion request.
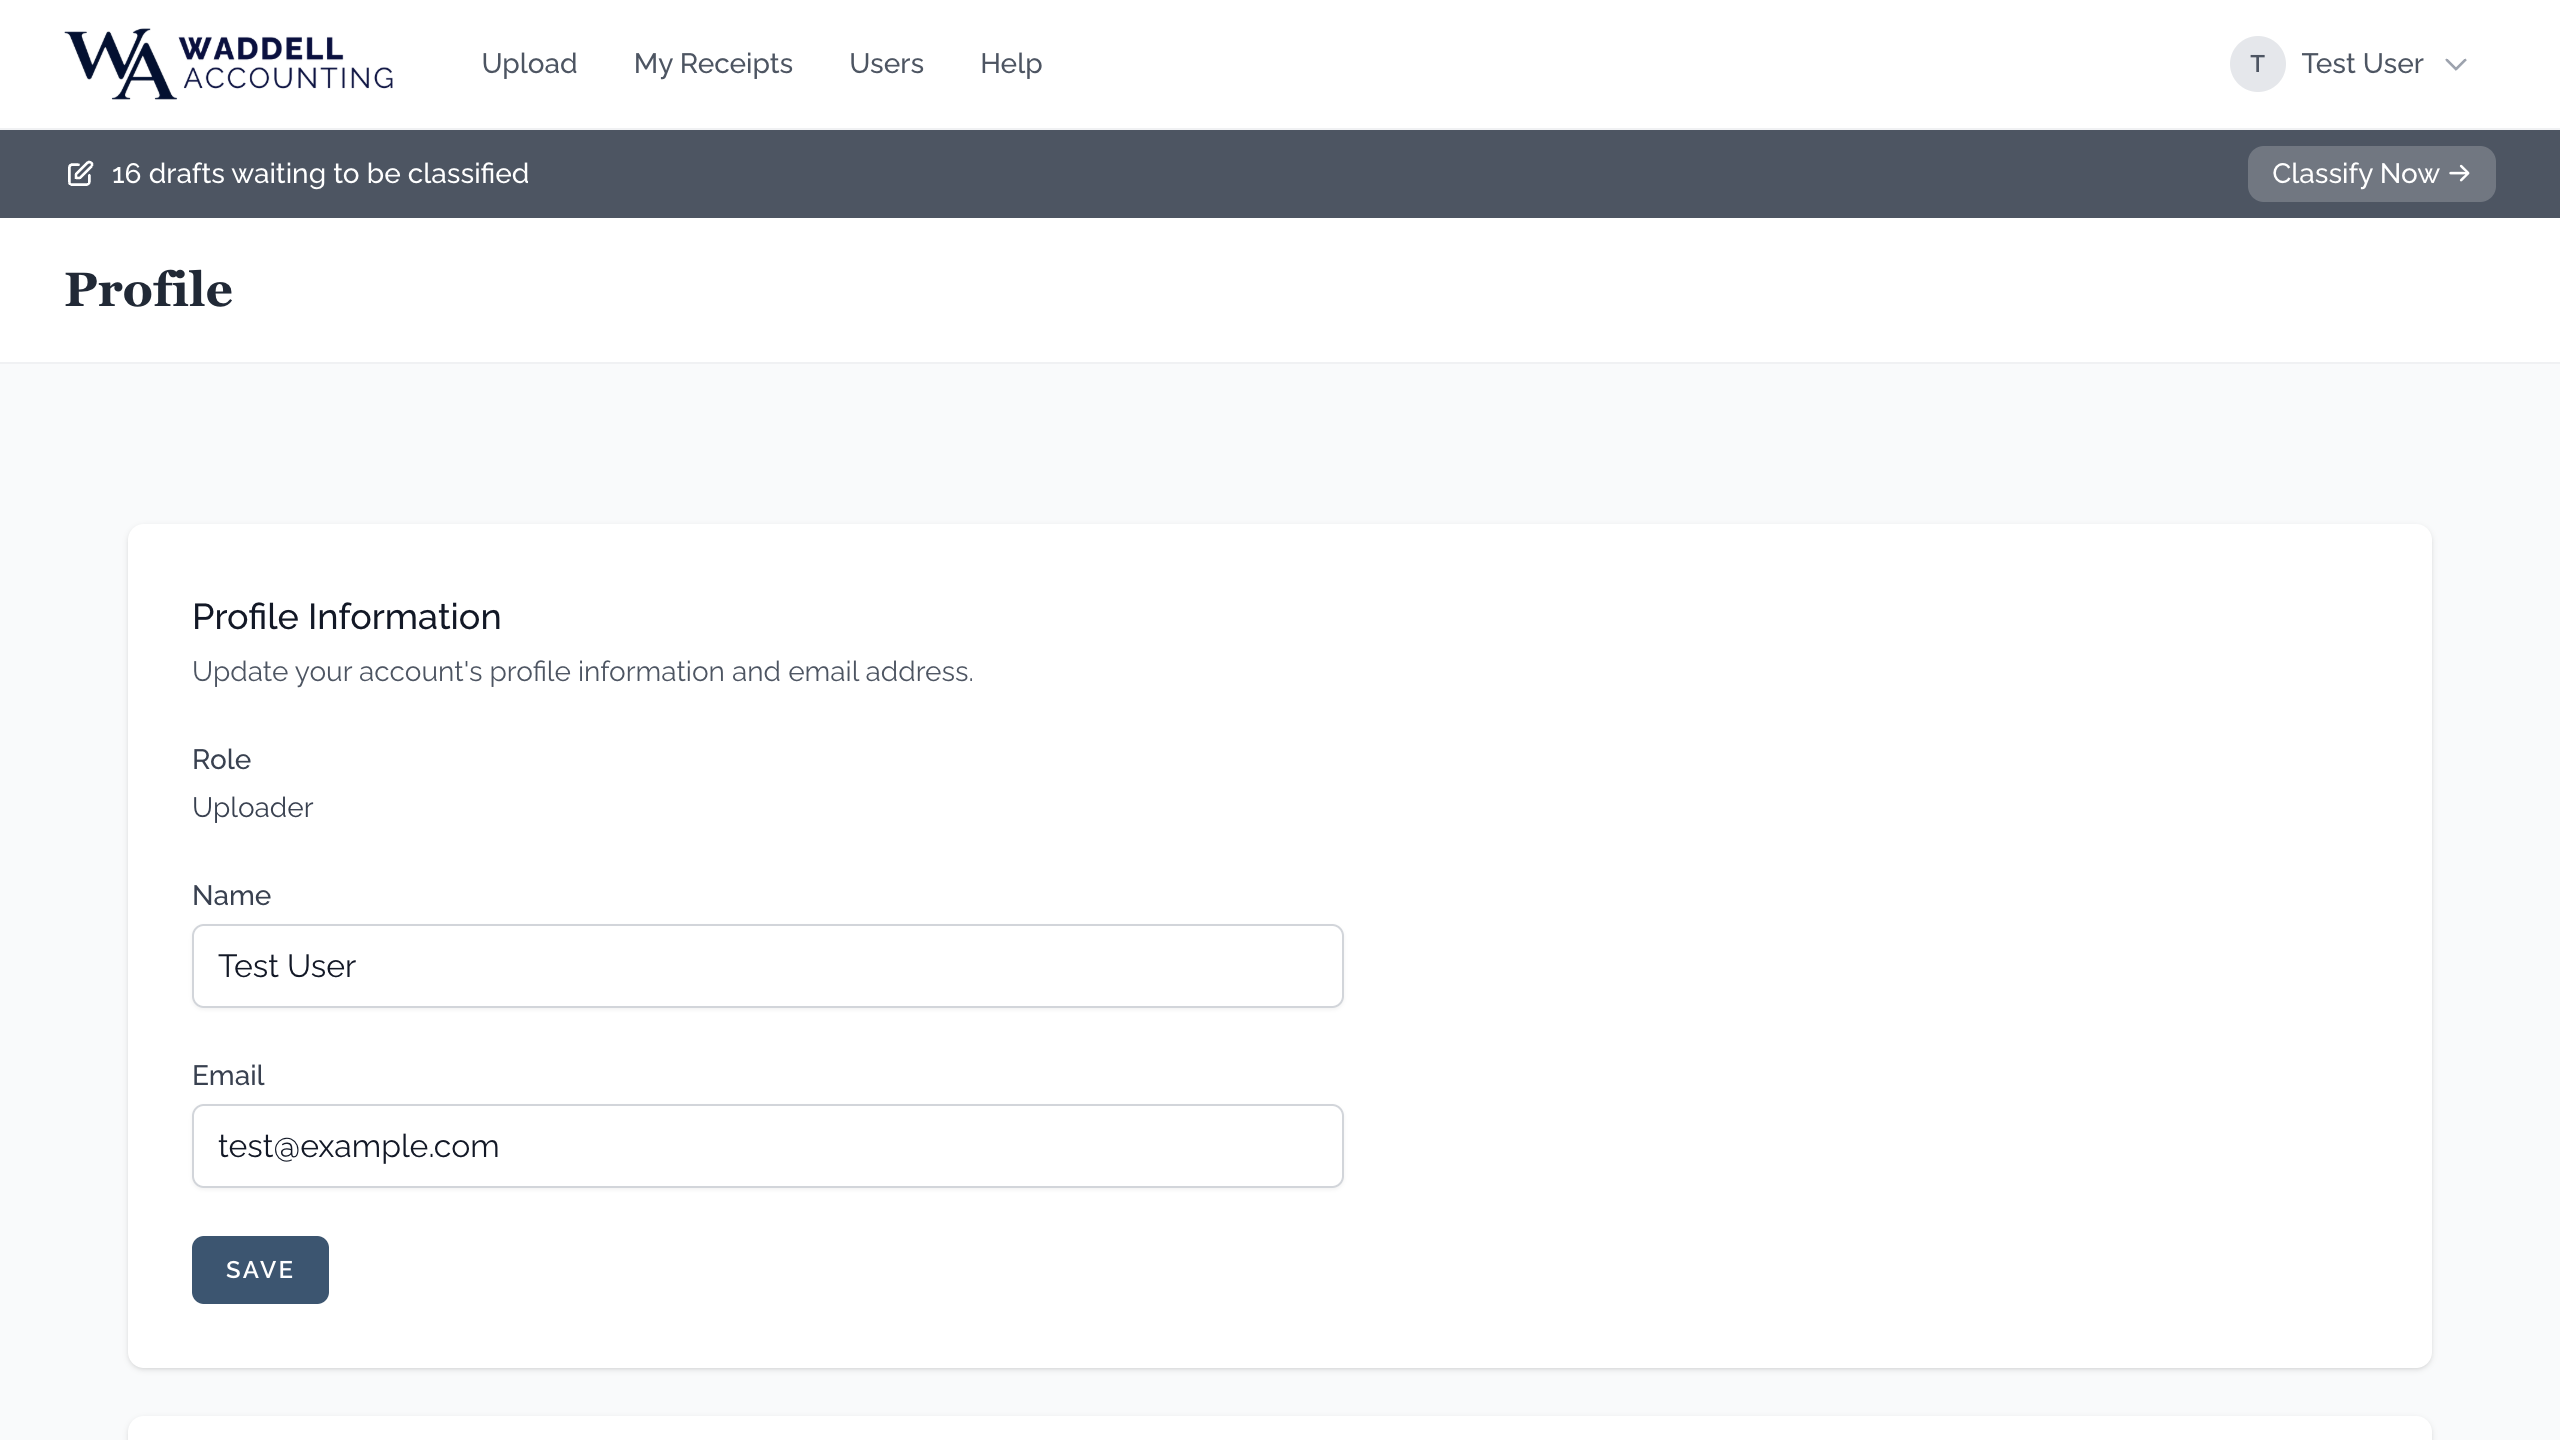
9. Changing Your Password
- Click or tap your name in the top corner of the screen.
- Click or tap "Profile."
- Scroll down to the "Update Password" section.
- Type your current password.
- Type your new password.
- Type the new password again to confirm it.
- Click or tap "Save."
- You will see a message confirming that your password has been updated.
10. Updating Your Name or Email
- Click or tap your name in the top corner of the screen.
- Click or tap "Profile."
- Change your name or email address as needed.
- Click or tap "Save."
- If you changed your email address, check your inbox for a verification email and follow the instructions in it.
11. Logging Out
On a Computer
Click your name in the top corner of the screen, then click "Log Out."
On a Phone or Tablet
Tap the menu icon (☰), scroll down to the bottom of the menu, then tap "Log Out."
12. Using Dark Mode
Dark mode changes the screen to use a dark background with light text. Some people find this easier on the eyes, especially in a dim room or at night.
On a Computer
Click your name in the top corner of the screen, then click "Dark Mode" to turn it on, or "Light Mode" to switch back.
On a Phone or Tablet
Tap the menu icon (☰), scroll down, then tap "Dark Mode" or "Light Mode."

13. Reviewing Check Runs (Signers & Trustees)
A check run is a batch of invoices that your accountant has grouped together for payment — either by check or by electronic bank transfer (ACH). At the end of each payment cycle, the check run is closed and becomes available for you to review.
This section is for users with a Signer or Trustee role. Regular uploaders do not see Check Runs in their menu.
How to Find Check Runs
On a Computer
- Log in to the portal. You will be taken to the signer portal automatically.
- In the navigation bar at the top, click Check Runs.
On a Phone or Tablet
- Tap the menu icon (☰) in the top corner to open the menu.
- Tap Check Runs.
Reading the Check Runs List
The Check Runs page shows all closed check runs organized by fiscal year. The most recent fiscal year is expanded at the top. Older fiscal years are collapsed — click or tap the row to expand them.
Each check run card shows:
- The run name (for example, "April 1 – April 15, 2026")
- The date range of invoices included
- How many invoices are in the run and the total dollar amount
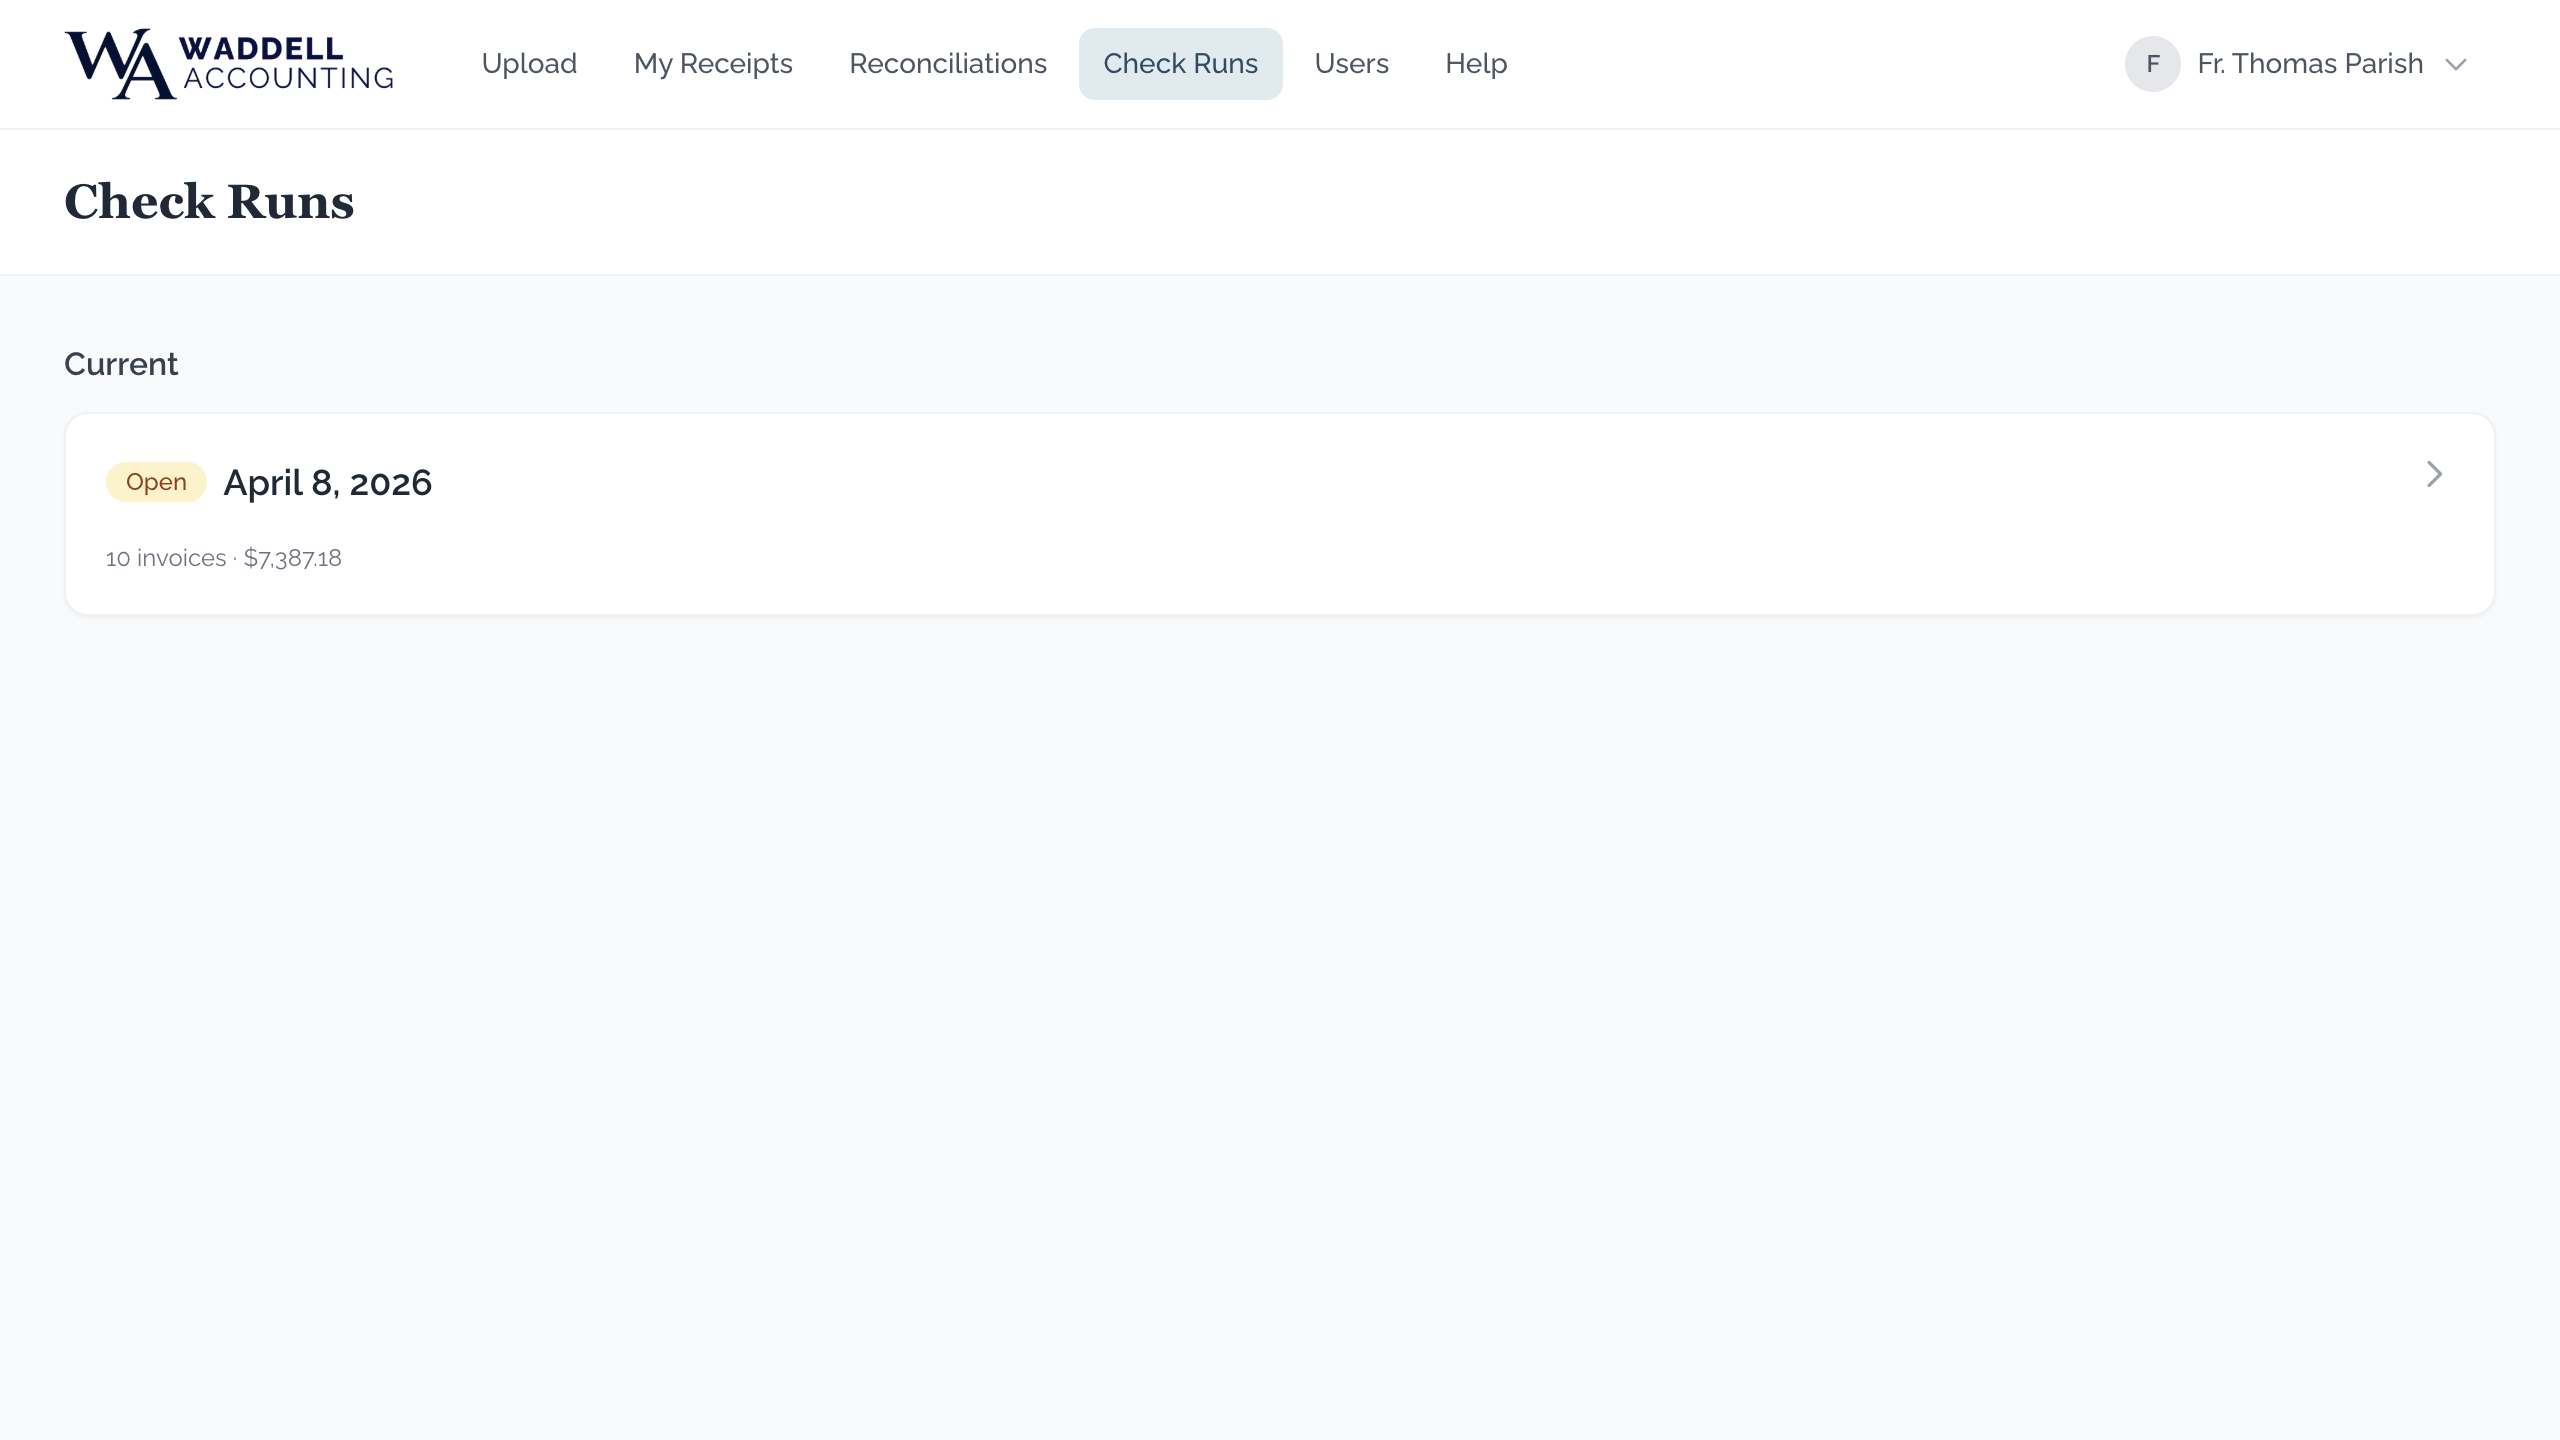
Opening a Check Run
- Click or tap a check run card to open it.
- At the top you will see a summary: the number of vendors, the number of invoices, and the grand total.
- Below the summary, the run is split into two sections:
- Checks — invoices paid by paper check, grouped by vendor. Each vendor group shows a subtotal.
- ACH Payments — invoices paid by electronic transfer, listed individually (not grouped by vendor).
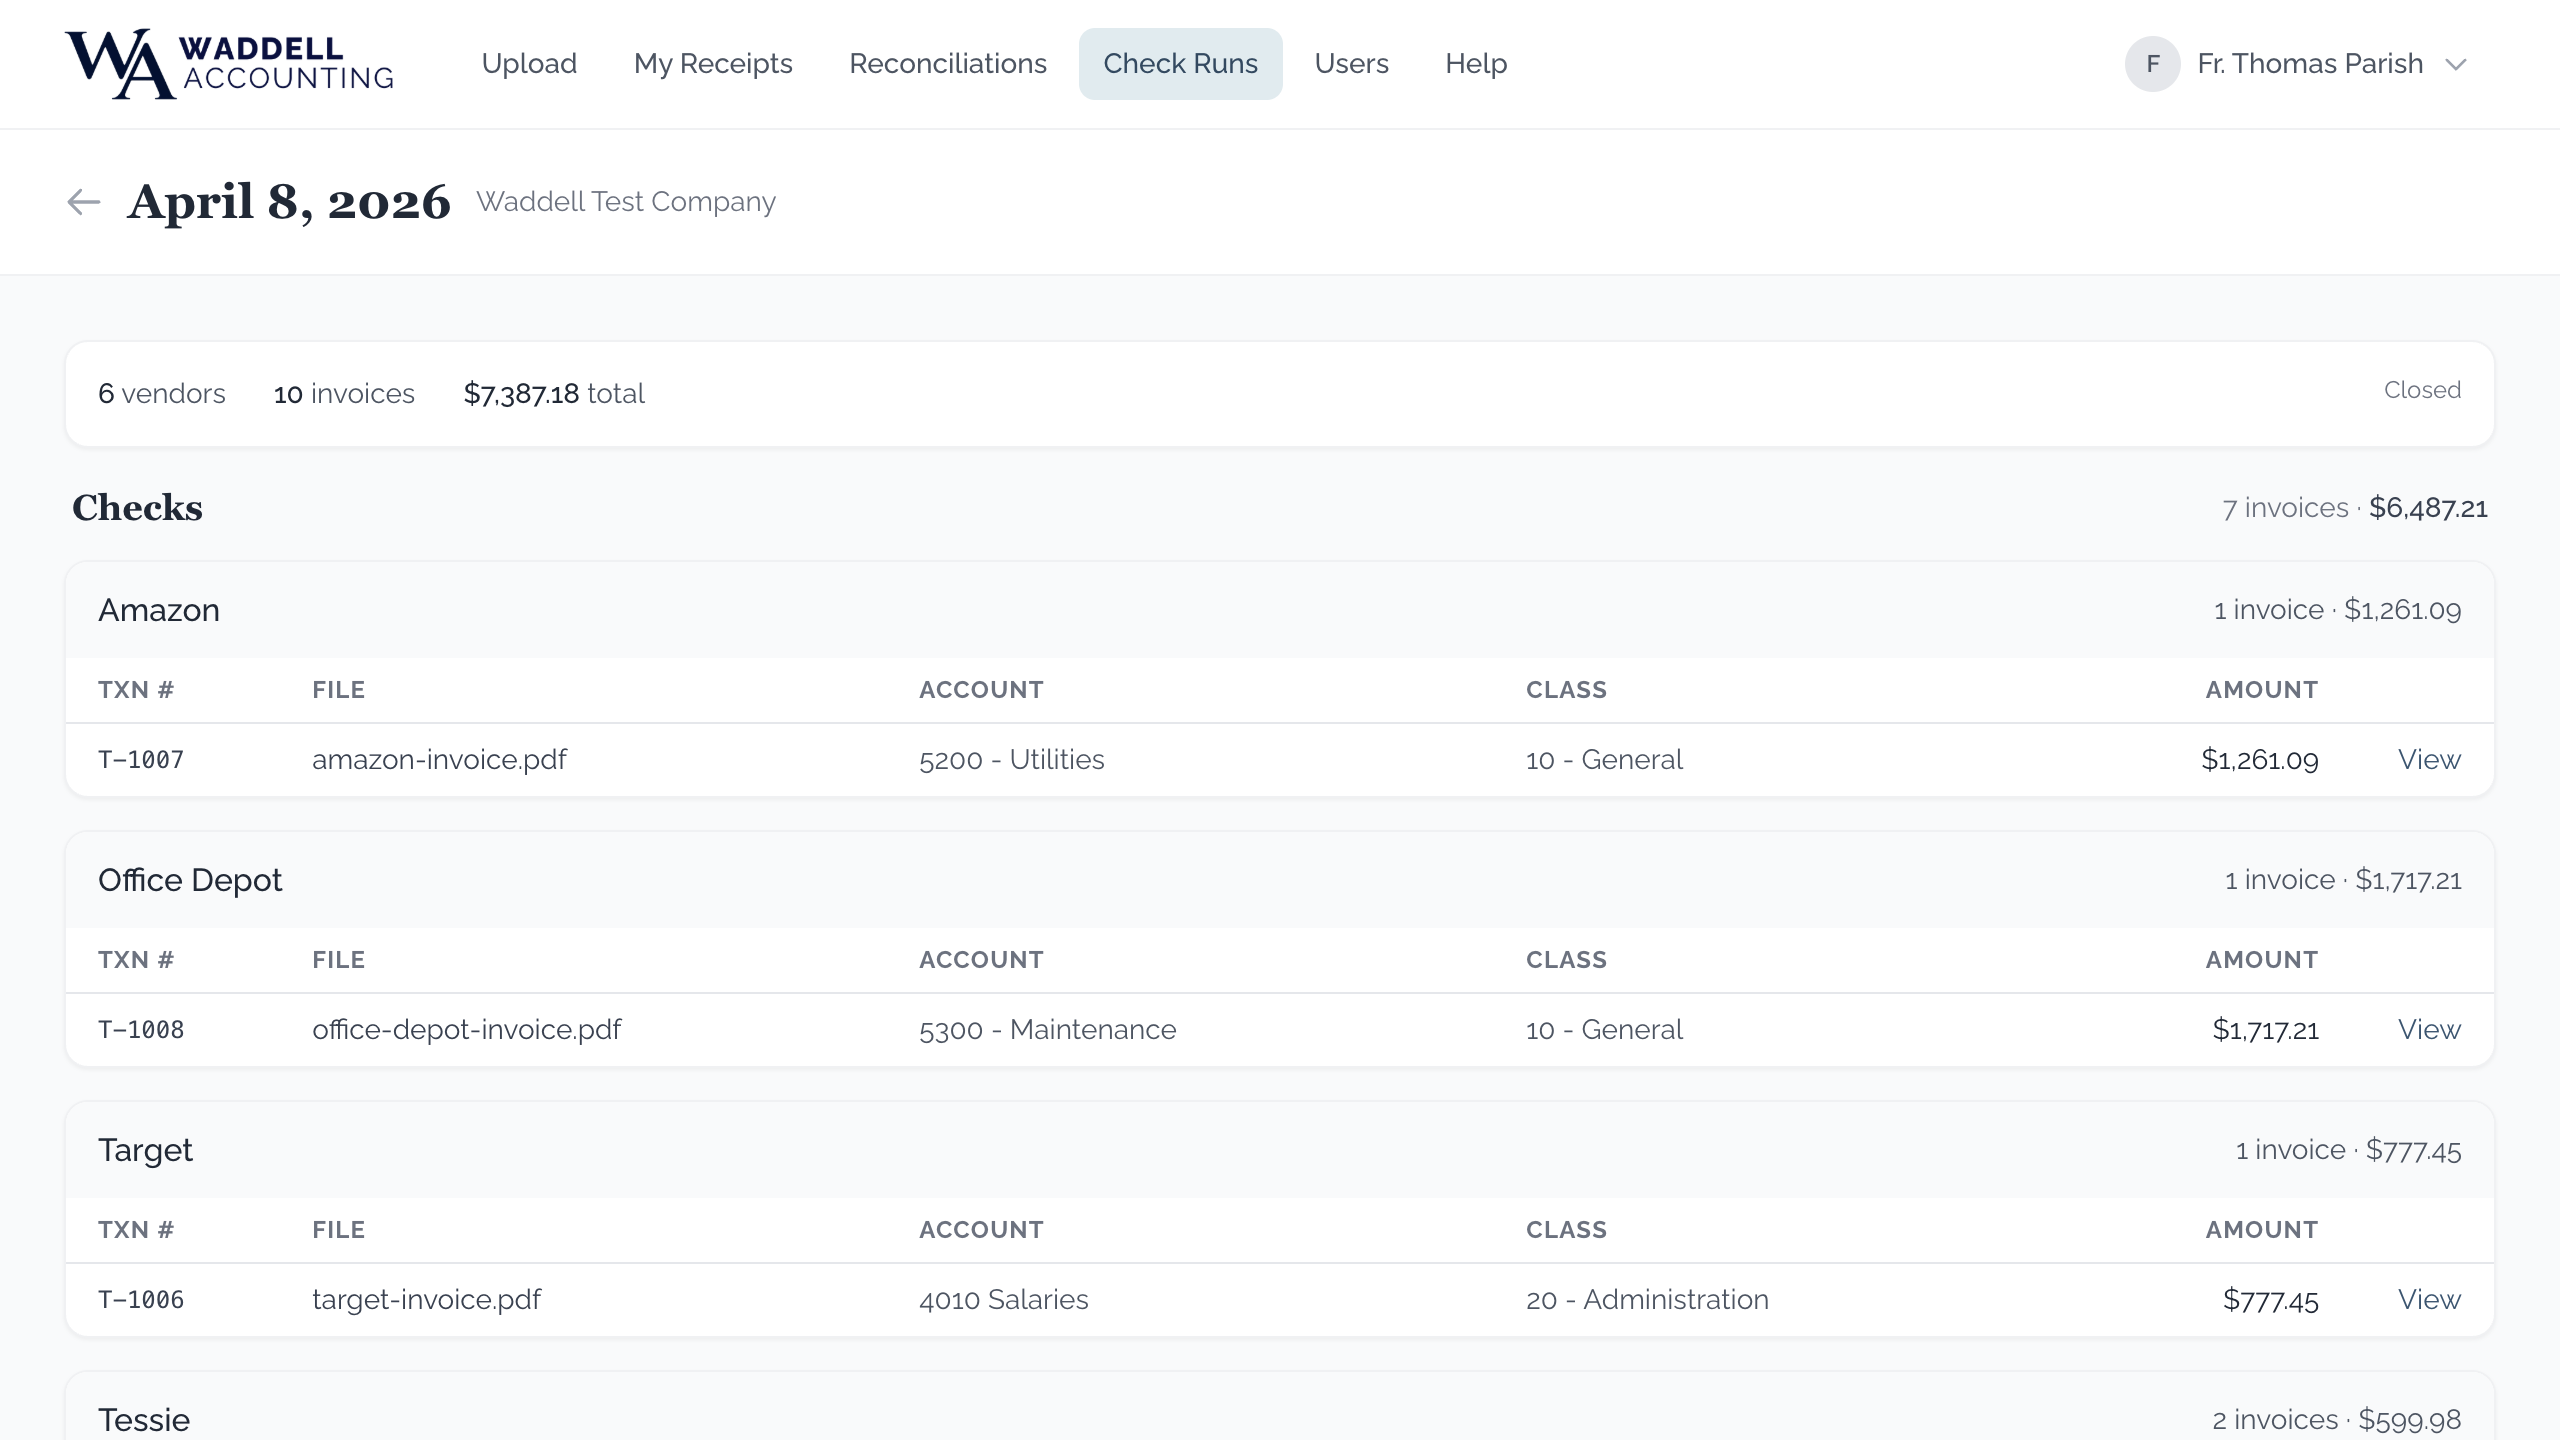
Viewing an Invoice
Each row in the check run table has a View link on the right. Click or tap it to open the original invoice or receipt in a new browser window (the file opens in OneDrive). This lets you verify the document matches the line item.
14. Bank Reconciliations (Signers & Trustees)
Each month, your accountant prepares a bank reconciliation for each of your organization's bank accounts. The reconciliation compares the parish checkbook to the bank statement and confirms everything matches. You are asked to review and approve (sign off on) each reconciliation.
This section is for users with a Signer or Trustee role. Regular uploaders do not see Reconciliations in their menu.
How to Find Reconciliations
On a Computer
- In the navigation bar at the top, click Reconciliations.
On a Phone or Tablet
- Tap the menu icon (☰) and then tap Reconciliations.
Active vs. Archived Months
The Reconciliations page has two sections:
- Active — months that are waiting for your review or signature. These appear as cards at the top of the page.
- Archived — months where both parties have already signed. These are grouped by fiscal year and collapsed to keep the page tidy.
Each active month card shows how many accounts are ready to review and how many you have already signed.
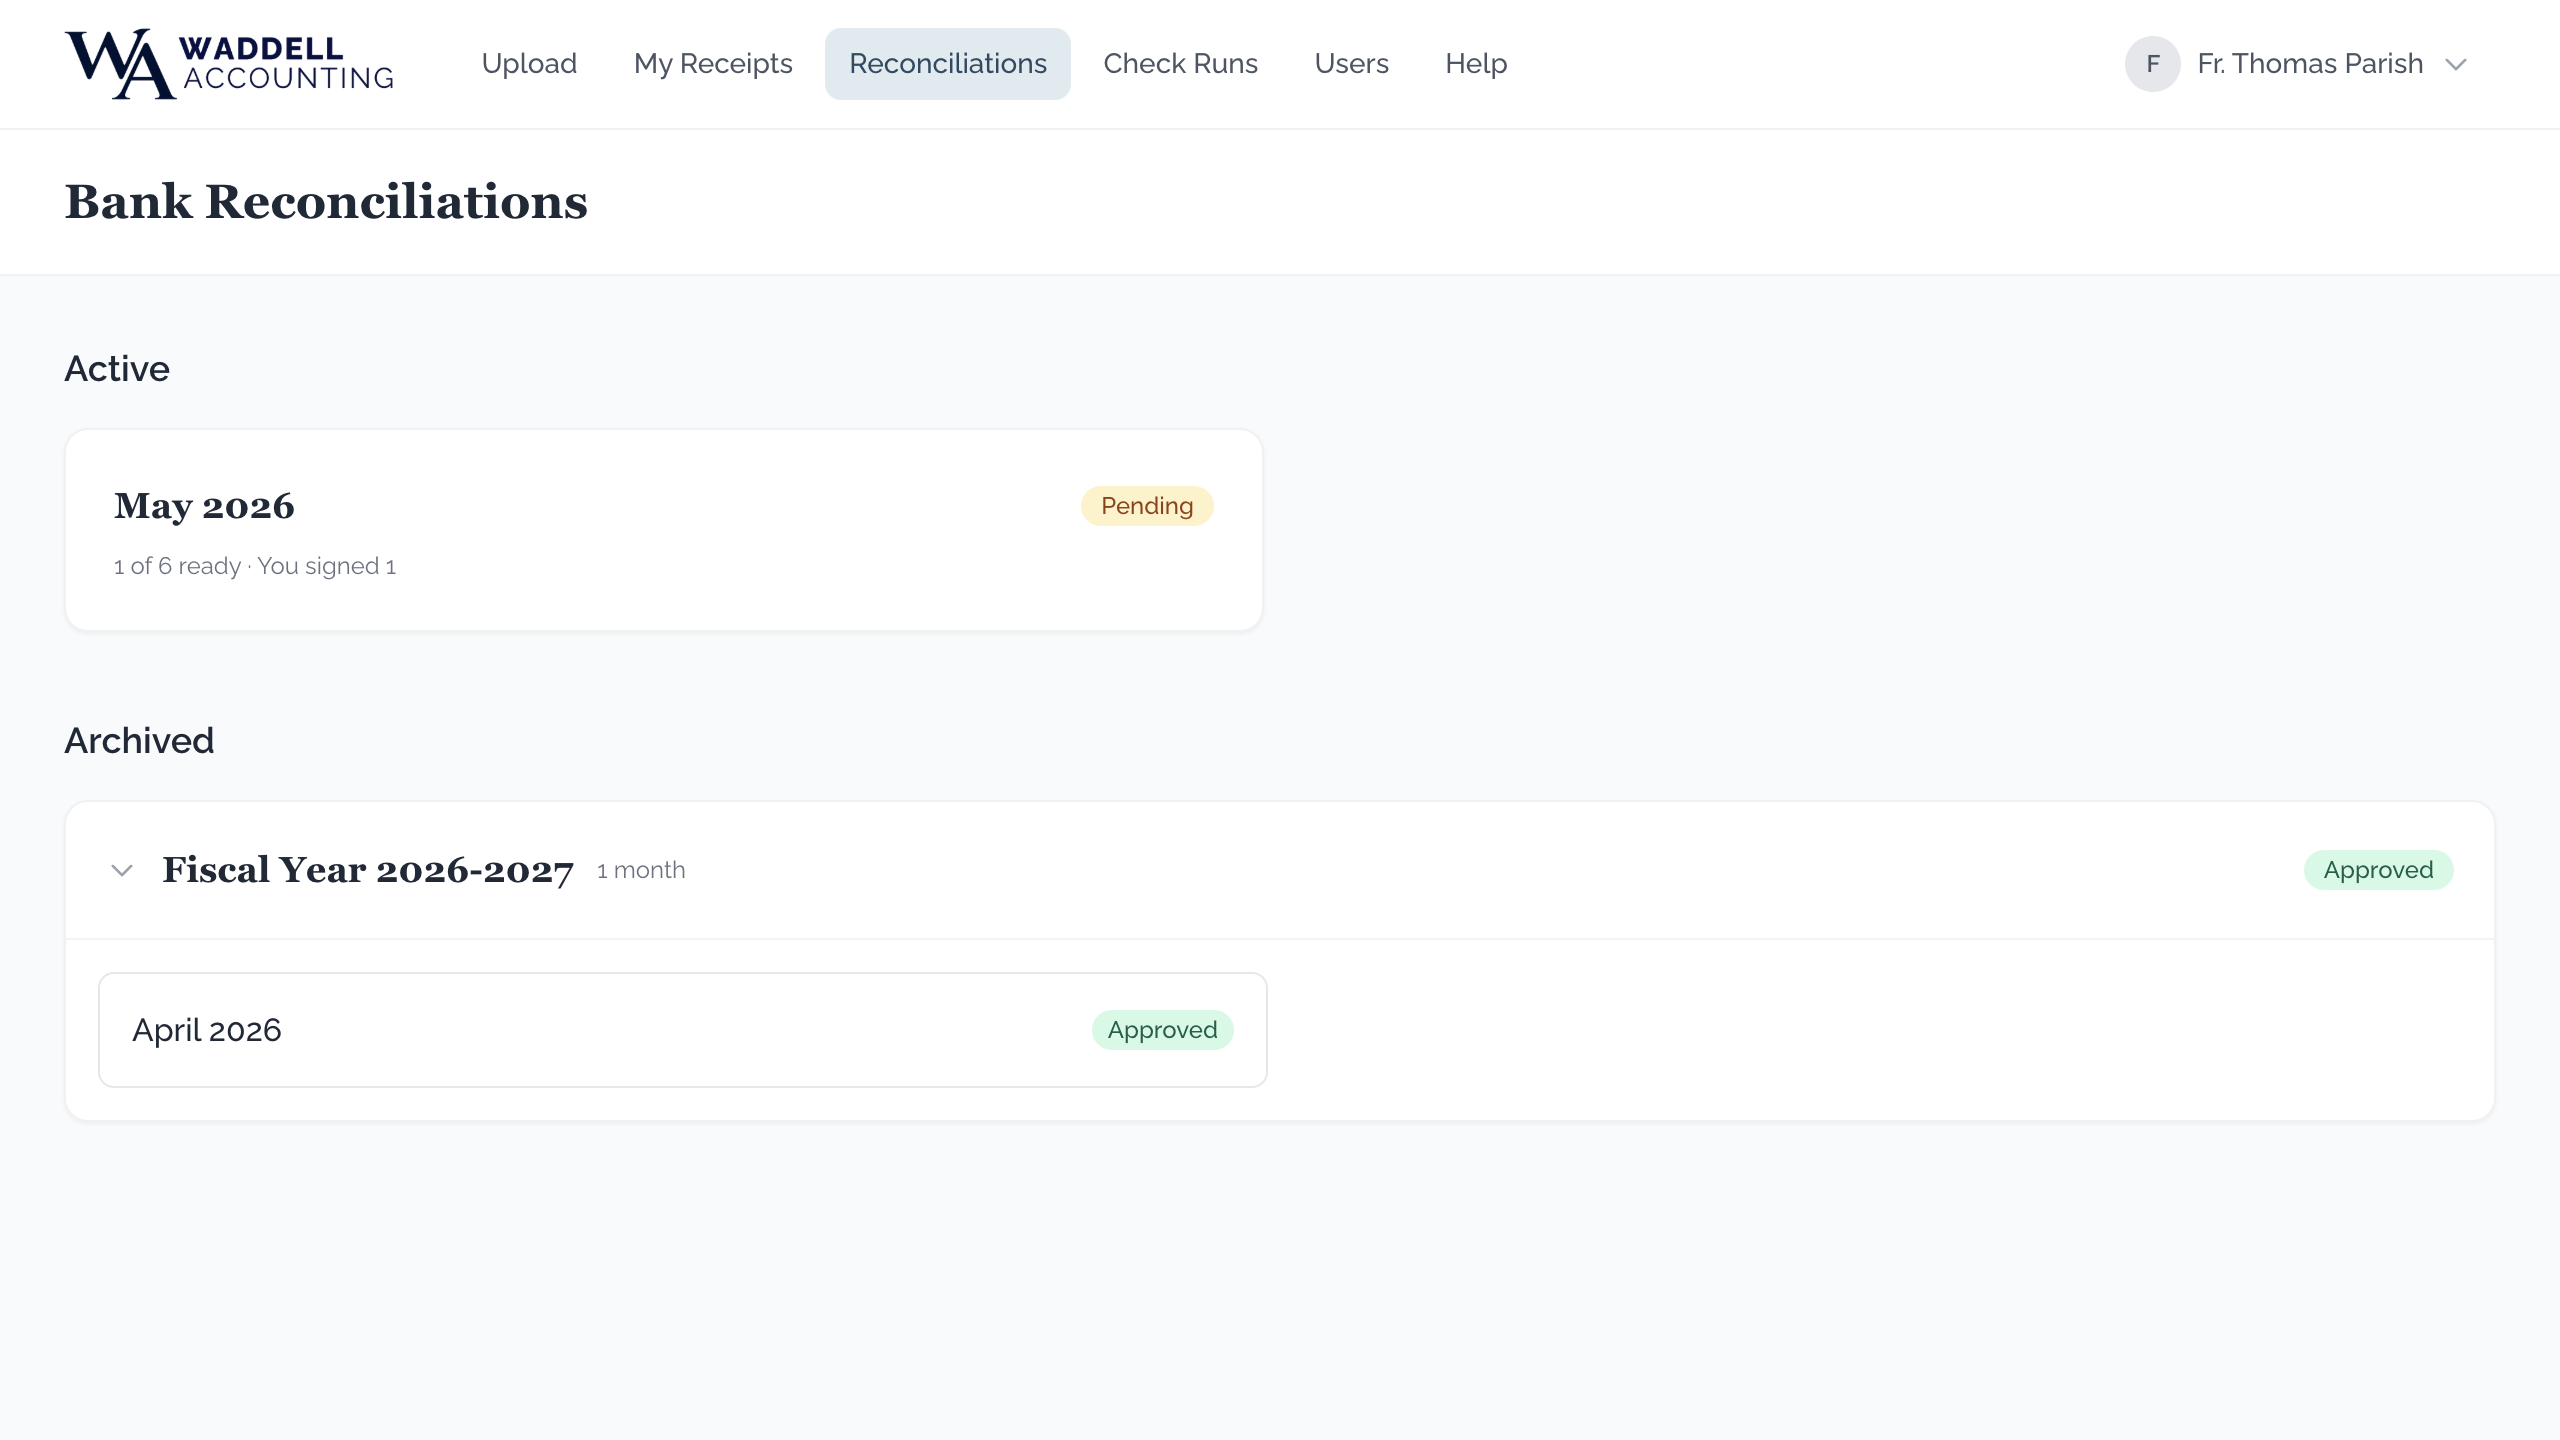
Opening a Month
Click or tap any month card to open it. You will see one card for each of your organization's bank accounts. Each card shows:
- The account name
- A colored status badge (Pending, Ready for Review, or Approved)
- Who has already signed, and who is still waiting
Viewing a Reconciliation PDF
- Open the month you want to review.
- On the account card, click or tap the "View Reconciliation" button. The PDF will open in a new browser window or tab.
- Review the reconciliation carefully. When you are ready to approve it, come back to this tab and click the "Sign as [Your Name]" button.
Signing (Approving) a Reconciliation
- After reviewing the PDF, click or tap the "Sign as [Your Name]" button on the account card.
- A confirmation box will appear, showing your name, the account name, and the month you are approving.
- Click or tap "Confirm Approval" to record your signature.
The reconciliation is fully approved when both the Signer and the Trustee (or Cosigner) have signed. Once both parties sign, the month moves to the Archived section.
Adding Comments
Each account card includes a Comments section where you can leave notes for your accountant or the other signer. This is useful if you have a question about a specific account before you sign.
- Scroll down to the Comments section on the account card.
- Click or tap the comment box and type your note.
- Click or tap the "Comment" button to post it.
Editing and Deleting Comments
You can edit or delete your own comments as long as the reconciliation has not been fully approved by both parties yet.
- To edit: click the "Edit" link under your comment, make your changes, and click "Save."
- To delete: click the "Delete" link under your comment and confirm the deletion.
15. Payment Methods (Check and ACH)
When you are reviewing an Invoice / Receipt on the classify page, you will see a Payment Method section. This tells your accountant how the invoice was or will be paid. There are two options: Check (default) and ACH.
Choosing a Payment Method
The Payment Method radio buttons appear just below the "Pay From Account" field when you are classifying an invoice. Select whichever method applies:
Paid via Check (Default)
This is the default option. Select "Paid via Check" when the invoice will be or was paid by mailing or handing over a paper check. No additional information is needed.
Paid via ACH
Select "Paid via ACH" when the payment goes out electronically. When you select ACH, a Payment date field will appear to the right. You must enter the date the payment was (or will be) sent. This date is used to match the transaction to your bank statement.

Credit Card Charges (Separate Upload Type)
If you are uploading a receipt for a credit card charge, use the Credit Card upload type on the Upload page instead of "Invoice / Receipt."
On the classify page for a Credit Card upload, you will see a Credit Card dropdown (instead of "Pay From Account"). Select the credit card the charge was made on, then fill in the rest of the details as usual.
- Use Invoice / Receipt when you receive a bill that gets paid later (by check, ACH, or credit).
- Use Credit Card when a parish credit card was swiped or used online for a purchase — the charge appears directly on a credit card statement.
On a Phone or Tablet
The Payment Method radio buttons appear in the same place on a phone as on a computer — just below the Pay From Account field. Scroll down if you do not see them right away. Tap a radio button to select it. When you select ACH, the date field will appear — tap it to open your phone's date picker.
16. Connecting QuickBooks Pastor Feature
17. Troubleshooting & Common Questions
18. Understanding Banners and Badges
As you use the portal, you will see colored bars and small badges that help you keep track of your receipts. Here is what each one means:
- Blue "Batch Mode" bar — appears when you are uploading multiple receipts. Shows how many you have sent.
- Amber "Continue Classifying" bar — appears when you have batch receipts waiting to be reviewed. Click it to jump to the next receipt.
- Gray "Drafts waiting" bar — appears when you have individual draft receipts that haven't been submitted yet. Click "Classify Now" to review the next one.
- Draft count badge — a small number next to "My Receipts" in the menu showing how many drafts need attention.
- Blue dot — appears next to receipts in your list that are part of a batch and haven't been reviewed yet.
